Wednesday, February 29, 2012

Surprise Birthday Party


One of my very best friends celebrated her 33rd birthday on Monday and today K and I went to her house for a play date. K and his two friends (her three year old daughter and two year old son) played so well together. He cried when we had to leave, but it was nearly 7 and I still had to make dinner. Whoops!!


While we were there, we had a mini birthday party. I brought along a present, chocolate muffins, and a candle to boot!


I crocheted her a lavender mohair scarf that totally reminded me of her when I saw it in my crochet pattern book.


It is the same book that I made this scarf from. After making that first scarf, I kind of thought I'd never do something like that again, but I decided it was the perfect gift for her. We both like to sew, but her skills are quite above mine; so that was out. Luckily, however, she's not a crocheter.

It took a good amount of time to complete, but it was easy to remember the pattern for the flower, so it worked up fairly quickly towards the end. For some reason, I could never remember the pattern of the first scarf, so I was constantly checking the book. I think that's one reason it took me AGES to finish.

As above, I also made a batch of chocolate muffins with white chocolate chunks for the celebration. I'll post about those (and the recipe) tomorrow. Be sure to check back - they were delicious and dead easy!!

Happy birthday, Hitomi!!

- Posted using BlogPress from my iPhone

Tuesday, February 28, 2012

BREAD!!!


In preparation for our upcoming trip to America, I've starting stocking the freezer so that Y has some food to live off of while K and I are gone.

Last summer I made and froze enough meals for 6 dinners (Monday through Friday, plus one weekend meal) a week while we were gone. This may seem excessive, but there is one restaurant where we live and it closes by 10. The grocery store is lights out at 9. Y often doesn't even get home until 11 or 12. He'd have nowhere to pick up his dinner and he certainly isn't going to cook himself something starting at midnight.

I'm doing the same thing this time (I'll post a photo once the freezer is full), but I'm also making him his snacks. As I've posted about before, I've been making bread for him to take to work each day. On Sunday I made a cinnamon with dried fruits loaf.


The cranberries, pineapple, apricots, and raisins looked so pretty. It kind of reminded me of stained glass.

While we are gone, Y will be munching on (from left to right):
- apple bread,
- squash and sweet potato bread,
- walnut and black sugar soba flour bread,
- corn bread, and
- white sesame rice flour bread.


I ran my bread maker pretty much non-stop from yesterday morning until this afternoon. It wasn't all that much work, I just plopped the ingredients in and pressed start, but it did take ages and I had a few small casualties - a burnt thumb and a sliced finger. The things we do for love!!


- Posted using BlogPress from my iPhone

Monday, February 27, 2012

Sponges. Ewwww...


Last week, for some reason, I decided that sponges gross me out. For as long as I can remember if I washed a dish, I did so using a sponge. I know that some people disinfect sponges in the microwave, but I've never bothered to google how that works (which is odd given the plethora of random things I google), and as a result I've never done it. I just throw out the sponge once it gets gnarly enough.

Last Friday I decided to make a little cloth for dish washing. I thought I'd make a couple and just wash them on a rotation. I made this little plum blossom first.


The little guy worked well. It certainly got all of my dishes cleaned. But it was too tiny and a bit difficult to use.


So on the weekend I decided to spend all my free time crocheting rather practical, rectangular, day-of-the-week dish washing cloths (using yarn I had sitting around). I embroidered the kanji for each day of the week on a separate cloth. I could very well have left this last step out, but I think I'd forget to throw the cloth in the wash at the end of the day, thus completely defeating the entire purpose.

After making them, I was thinking of how to store them - I'm pretty sure they would get lost if I just threw them in a drawer. I ended up putting them into a little tin that was given to me by one of my English students. It's so cute and pink and vintage-looking that I wish I would have made the cute flowers (even though they would have been annoying to use) instead of the rectangles.


Don't the tan cloths look so sad compared to the tin? Maybe when these bad boys give out, I'll put some thought into making bigger flowers and maybe even a few strawberries and hearts to match the tin.

Eeeek! How exciting. Now I kind of want these guys to give up so I can have an excuse to make new ones.


- Posted using BlogPress from my iPhone

Thursday, February 23, 2012

Car Case


Last week, I made a clutch that is going to help me keep the little things at hand on our plane ride to the States. I made it because all the little things float to the bottom of my purse, making it impossible to access them when needed.

Do you know what else finds their way to the bottom of my purse? K's cars. He likes to bring a few along whenever we leave the house. He generally carries one, but then wants a different one at some point. He tends to get a bit "impatient" while I'm ransacking the bottom of my bag looking for the one car he wants. It's awesome.

To alleviate this issue on the plane (and to ensure we don't leave any of his tiny treasures in the plane), I made him a car carrying bag. It's like an eight car garage all conveniently contained in a little bag.


I had to make the bag long enough so that his favorite train could fit at the bottom. He's loved this train since he first received it. Although it's metal, he sometimes brings it to bed with him. Dear me.

Usually my sewing projects are inspired by something I came across in someone else's blog, but this one was all my idea. (I imagine others have made something similar, but I haven't come across it.) As a result, I was quite proud of the fact that it turned out as it did.


I'm not gonna lie, however, this bag took me ages to work out.

The first night it took me three hours to figure out the measurements, cut and iron the fabric and get the interfacing attached. I wish I would have taken a photo at the end of the night, before cleaning up. It looked like a fabric store exploded in my living room.

The next day, while K was napping I spent two hours prepping the inside pockets and sewing the handle and front flap together.


Then, last night it took a final two and a half hours to get the eight tiny straps to hold the cars in place sewed on and then sew the bag together. Since I'm still just learning to sew, I'm not good at figuring out construction. I used this tutorial to make the basic bag. It's a brilliant tutorial if you ever decide you need to make your own messenger bag.

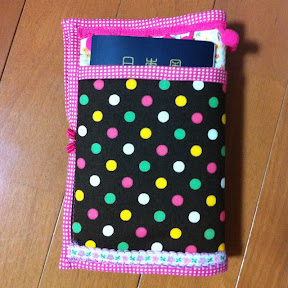
After I completed the bag last night, it looked like this.


I liked it, but it seemed a tad boring. I looked through my trims to see what I had and found the train/tree/house ribbon that is on it in the first photo and the one below.


I think it added heaps to the final product. I only wish I would have put it on while I was making the flap. It would have looked way cleaner, but I wasn't about to deconstruct the whole bag just to do that. Next time, I suppose.

K saw it this morning and let out a big, "woooooow". I think that means, "OMG!!! That is so cool," in K talk. At least that's what I'm going to believe it means. Since it's all Velcro up in that bad boy, he can open it, close it, and take cars in and out on his own.

This is all great, because after seven and a half hours of working on it, if he didn't like it or couldn't use it, I think I would have cried.

If you decide that you need your own eight car garage, leave me a comment and I can give you all the measurements I used so you don't have to waste your time figuring that bit out.


UPDATE:
One of my good friends from a few years back has asked for the measurements for a car case for his son. So here are my measurements and a few notes about how made it. It's quite long...

Materials (all measurements in centimeters):

• 3 - 20 x 20 squares from each of the main fabric, lining and quilting interfacing (front, back, flap)
• 3 - 12 x 20 rectangles from each of the main fabric, lining and quilting interfacing (sides and bottom)
• 2 - 46 x 16 strips from lining (car pockets)
• 2 - 46 x 7 strips from a strong interfacing (car pockets)
• 8 - 3 x 8 strips from lining (car straps)
• 8 - 1 x 4 strips of Velcro, rough parts cut into 1 x 1 squares, soft parts 1 x 4 (to keep car straps down)
• 1 - 30 x 22 rectangle from main fabric (handle)
• 1 - 30 x 10 strip from quilting interfacing (handle)
• 1 - 2.5 x 14 strip of Velcro (to keep flap down)

Basic Instructions:
Sew everything with a 1 cm seam, except the car straps. For those use as small of a seam as possible. I folded the strips in half so they are 1.5 cm wide and then folded all of the edges under and topstitched. Each strap is about 1 cm by 3.5 cm.

Iron the car pocket strip in half and attach the interfacing to one half of it. Right sides together, sew the bottom edges together and flip so the right sides are facing out. Topstitch on the opposite end. Mark the car pocket at 1 cm, 12 cm, 23 cm, 34 cm, and 45 cm. Sew the 4 cm strips of Velcro going down the pocket in the middle of each 11 cm segment. Sew the squares of Velcro to the ends of the small car straps.


Mark so the bottom of the car pocket is 7 cm up from the bottom of the lining. Sew the car dividing lines to the lining so that each pocket has 11 cm of slack sewn 4.5 cm apart from one another. Fold the bottom sides under and sew a line across to close it off.


Sew the straps 2 cm above the top of the pocket.


Prepare the flap and attach the Velcro 1.5 cm from the bottom of the flap. Sew the matching Velcro halfway down the front of the bag.

Prepare the handle the same as the car pocket (iron, attach interfacing, sew, invert).

Construct the bag as in the tutorial above. Insert the strap into the mix before sewing the lining and main bag together.

At the end, I folded the handle in half and sewed a line across to make it easier for K's small hands to hold.


Leave me a comment if something is unclear. I wrote down my original plan, but then changed a few things during the process, so something might be a bit off. Similarly, I didn't write down the steps as I was doing it, so that is all from memory. I hope it makes some sort of sense.

- Posted using BlogPress from my iPhone

Wednesday, February 22, 2012

Fish + Bread = Awesome


I have been debating all week whether to write about this bread or not. Quite honestly, I thought it sounded foul; turns out, however, it is delicious! How did it ever strike me to make something that (to me) sounds so awful? Because I'm trying to be a better person.

Here's a typical conversation between Y and me:
A: Hey babe, what do you want for dinner?
Y: Hmmm...curry.
A: Really? *said in a disgusted tone*

I hate that I do this and I'm trying to stop. If I didn't want to have Y's input, then I shouldn't have asked him.

As a result, this was our conversation last Saturday:
A: Ah! Can you look at the bread book to see what you want for snacks this week?
Y: Sure...this one!
A: Salmon and spring onion rice bread? Ok!!

So I made it. As it was baking, the smells coming from the bread maker were amazing. As soon as it was done, I had to try a bit. It tasted as good as it smelled. I made it from regular and rice flour, grilled then flaked salmon and chopped spring onion. Seriously, it's awesome.

I'd seen that bread in the book many times, but it always freaked me out. Another one that always catches my attention is the black sesame and tofu bread.

While I love both black sesame and tofu, I just couldn't quite imagine them in bread. With my confidence high thanks to the salmon bread, I decided to give it a go.


It, too, is delicious. Even K likes it - this is no small feat! It doesn't even have rice involved and it's still a winner in his book. Wahooooo!!!!

- Posted using BlogPress from my iPhone

Monday, February 20, 2012

Car Cookies


We had one of K's friend's come over this afternoon, so I wanted to bake up a treat for the kiddies (and mamas) to snack on. The challenge is that the friend is allergic to eggs. Since I'd just made shortbread last week, I wanted to do something different. Hmmm...

When K was just a little guy, I used to bake up these delicious little sesame cookies for him to munch. I hadn't made them in ages, but since they are eggless and simple to make, I figured I'd whip them up while K was napping and before the friend arrived.

I found this recipe in a Japanese kid's cooking magazine. The recipes are easy enough for kids to make, which means just a matter of minutes for a mom.

Whisk together 100g of flour, 20g of ground sesame seeds, and a pinch of salt. Using a plastic spatula, mix in 2 tablespoons of each vegetable oil and maple syrup. Roll the dough out to 4mm thick (mine are actually 6mm, but it's all good), cut and bake at 170C for 20 minutes.

They are totally baby/egg allergy friendly and super delicious to boot!!


- Posted using BlogPress from my iPhone

Saturday, February 18, 2012

Chocolate Cake with Salted Caramel Swiss Meringue Buttercream


With all of the Valentine's Day stuff going on this week, I totally forgot about the cake I made on Sunday. We had K's best friend and his parents over for a little dinner party on Sunday, so for dessert I whipped up this cake. It was divine.

I used this cake and Swiss meringue buttercream recipe. Seriously it was delicious.

I'd made the salted caramel Swiss meringue buttercream months ago and remembering how amazing it was, I did it up again.

I 100% recommend making this. The cake recipe makes two quite tall cakes, so I sliced each in half, but only used three layers.


The fourth is in the freezer with the leftover buttercream. I'm so excited to bust it out one day when I really need a sweet treat.

If you do make this cake, particularly the Swiss meringue buttercream, there are a few things you should know.

First off, Swiss meringue buttercream (in general) seems like a huge challenge, fickle and on the only-for-serious-bakers side of things, but it's not. There are a number of steps (cook eggs and sugar over a double-boiler, make a meringue, add butter and flavorings) and it takes a while, but it's so worth it.

Second, the first time I attempted Swiss meringue buttercream, it was a summer afternoon and Y's friend from college and his fiancée were coming over for dinner. I found a delicious sounding recipe for vanilla bean cupcakes topped with Swiss meringue buttercream and candied lemon slices. Sounds great, right? Well the buttercream turned into curdled soup and was a disaster. I remember I threw the buttercream away, but don't remember what I did to save dessert. The moral of the story is that I was an uninformed idiot - you just have to keep mixing and it will soon come back to it's fluffy self. If it's too warm, throw it in the fridge for five or ten minutes and go back to mixing.

Once you make the meringue, it looks like this.


Gorgeous. Then you add butter and it turns to this.


It's an awful picture, but it looks like curdled soup. You'll want to cry and think you've just ruined your gorgeous meringue. Don't cry. Keep mixing.


Starting to resemble something eatable.


Again, awful photo, but it's actually much better now and looks delicious.

Third, if you make the salted caramel version, at this point you need to add in the caramel sauce you just made. The first time I made it, it was a perfect sauce consistency, this time it hardened. I didn't know what to do (I keep forgetting to look into why this happened). I was scared to heat it too much thinking it would hurt my precious buttercream, but without heating, it was nearly solid - like a caramel candy. I heated it a bit and added it to the buttercream, but it got all chunky.


Gaaaa!!! I put the whole mess into the microwave for ten seconds and mixed again. I did this a million times, every once in a while switching it up with a trip to the fridge, and eventually it looked like this.


Perfection!!

I cannot praise Swiss meringue buttercream enough. It is the far superior buttercream. It's deliciously creamy, light and just sweet enough. It never feels greasy in your mouth. It's heaven. Give it a go!!


- Posted using BlogPress from my iPhone

Friday, February 17, 2012

The Catch-All Clutch


A few weeks ago I found this clutch on a blog. In case you don't feel like clicking over, it's made from a potholder and ziplock baggies --simple and genius.

I wanted to make one for the airplane ride to hold things like gum, medicine, masks, eye drops, i.e. all the little things that get stuck at the bottom of my purse when I need them. I tried looking for snack size baggies and couldn't find them at the supermarket. I also had no idea where to find a cute potholder that wasn't going to cost me a mental amount. With all the extra fabric I have laying about, I figured I could just make my own.

As I was starting from scratch anyway, I decided to make it a bit bigger so it can also hold our passports in the back pocket.


I didn't feel like going to the fabric store this week, so I made my own bias tape. Unfortunately I didn't do the most stellar job, but with a bit of ribbon and some pom pom trim (thanks Hitomi San), you'd never know the difference.

The inside has 10 little baggies that can hold any variety of things.


I imagine this will prove to be quite handy in regular life as well, not just for the airplane.

Making the clutch took a few hours, but that was because I made the potholder bit. If you were to make one as in the link above, it would take no time at all. It'd probably take longer to organize the bags and tape them all down than to sew a line down the middle and add a button and a loop.

Wahoo for easy and useful handmade projects!!

- Posted using BlogPress from my iPhone

Wednesday, February 15, 2012

Super Duper Chocolate Cake


A few years ago, Y gave me an amazing desserts cookbook. I asked him to pick something for me to make since I couldn't make up my mind of what to try first. He picked the Chocolate Truffle Cake. It's amazing, but it's also a lot of work. After making it the first time, I decided I'd never do it again. But, seeing how much he loved it has made me make it over and over again - but only for very special occasions.

The cake is delicious with layers of spongy chocolate cake surrounded by the creamiest ganache imaginable. The cake is super chocolatey. When I was about 7 months preggers with K, I made the cake for our anniversary and if I ate a piece too close to bedtime, I couldn't sleep - K would bounce off the walls of my tummy keeping me awake. I have no idea if that connection is even possible, but I swear every time I had a piece, it was like an octopus was in my stomach for hours on end.


Without further ado, here is the recipe (adapted from Donna Hay's "Modern Classics Book 2").

Super Duper Chocolate Cake

Cake:
1/2 c flour
2 tbls cocoa powder
1/3 c sugar
4 eggs
80g melted butter

Truffle Filling:
300g dark chocolate
1 1/3 c cream
4 egg yolks
1/4 c sugar

Cake:
Preheat the oven to 180C. Whisk the flour and cocoa together and set aside. Place the sugar and eggs in a bowl and beat with a mixer for 8 minutes. It should be pale and thick and the volume will have increased. Fold the flour and cocoa through the eggs, then fold in the butter. Take the bottom out of a 20cm round cake pan and line it with non-stick baking paper. Pour in the mixture and bake for 30 minutes or until the cake is done. The edges should come away from the sides of the tin. If not use a palette knife to go around the edges and slightly push the cake towards the center. Cool in the tin.

Filling:
While the cake is cooking, make a ganache by placing the chocolate and cream in a saucepan over low heat and stirring until melted and smooth. Place the egg yolks and sugar in a heatproof bowl over a pan of simmering water and beat for 6 minutes. It should get thick and creamy. If possible, use a candy thermometer to ensure the mixture reaches 70C. Fold the ganache through the egg mixture and beat for six minutes or until cool. Refrigerate for 30 minutes.

Assembly:
Remove the cake from the tin and cut in half horizontally. Wash the outside part of the pan Put the bottom layer back in the tin and pour in half of the filling. Give the pan a little shake or tap it on the counter a few times to ensure the filling goes down the sides. Place the top layer on the cake and cover with the remaining filling, again give it a few shakes or taps. Refrigerate for 5 hours or until set.

To serve, wet a towel with hot water and rub it against the outside of the pan. Do this several times until the filling starts to melt and you can push the cake up and out of the tin. Warm a palette knife under hot water, quickly dry it off and rub it over the edge to smooth it out a bit. Warm a knife under hot water, dry it off and cut. Do this for each cut you make.

Yum.


- Posted using BlogPress from my iPhone

Tuesday, February 14, 2012

Valentine's Day


Yay!! It's Valentine's Day♡

In Japan, we do things a bit differently for Valentine's Day. Only the women give gifts to the men and the gifts generally consist of chocolate - just chocolate. Don't worry ladies, we certainly don't get the shaft on this one. Exactly one month later on March 14th, we celebrate White Day. This is the day that men have to pay us back. Three fold. We totally win!!

So, for Y's gift, I wrote him a little love letter and put it in a handmade felt heart envelope. I saw a tutorial for this a few days ago and thought it was so cute. I didn't use the exact template, just did one on my own.


I also baked Y some chocolate shortbread hearts using this recipe. They looked a bit boring, so I drizzled some white chocolate over the tops and voila! Instantly cuter!


Instead of the romantic route, I decided to be a bit goofy with dinner. I made a heart shaped pizza and salad with carrot hearts.


I also made one of Y's favorite chocolate cakes for dessert, but we've yet to cut it open. I'll post about it tomorrow with a recipe included!!

For myself, I made a little headband. I think it turned out really cute. I might make a few more in colors that I actually wear. I think they'd be great for every day.


Happy Valentine's Day!! I hope you have a great day with your loved ones!!

- Posted using BlogPress from my iPhone

Monday, February 13, 2012

Lemon Cookies


Last week, one of our neighbors brought over a few lemons from her mother's lemon tree. They were so yellow and beautiful and incredibly juicy. They were quite amazing, really. I thought and thought about what to make with them and finally decided on these lemon cookies.

They were delicious! I think you'd have to start with really good lemons, so if you've got some handy, this recipe is certainly worthy.

You start out by making a lemon curd - already one if my favorites. After seeking out a good recipe about a year ago, I finally settled on Martha's. I've made it a million times, including for a friend's wedding cake, and it has yet to fail me. For the cookies, I halved the recipe, but you could probably even third(?) it.

Then you get cracking on the cookie dough. You have to refrigerate it for one hour, but you might want to make the lemon curd in the morning and cookies in the afternoon to give the curd enough time to settle.

Roll the dough into little balls, I used a 1/2 tablespoon as my standard and flatten them. (This made close to 60 cookies.) The recipe says to use the palm of your hand (I think), but I found that difficult. I just used a few fingers.


The poke a little hole using your thumb. I found that the more I did this, the more the dough stuck to my finger. I figured out that dipping my thumb/finger in water every few cookies made this process way easier.

Finally pipe in the lemon curd. At first I didn't want to pipe it. I was being lazy and didn't want to deal with putting it into a bag and then having to wash tips. I tried to just spoon in the curd on the first few cookies, but it wasn't working out so well. I finally just put it into a baggie and chopped off the corner (a bit lame, but it works - and no washing tips!!). It was SO much easier this way. I totally recommend doing this from the start. It really takes no effort.


On top of it, once they are cooked, you can totally see the difference. The piped ones look so much cleaner.


Spooned vs.


Piped

The cookies were quite delicious this way, so if you leave off the powdered sugar, piping is important. I was tempted to leave them like this, but they looked like fried eggs to me and started to creep me out.

I ended up sprinkling the powdered sugar on and I think they look quite cute and for some reason a tad bit less like fried eggs.

- Posted using BlogPress from my iPhone