Friday, March 29, 2013

Doggies!!


Last week, I posted about some Oreo cupcakes that I had made for my friend, Roxana. Roxana really loved the cupcakes and had told one of her friends, Cristina, about them. Last night, Cristina threw a birthday party for one of her friends and asked me to make the cupcakes for the party. Of course, I agreed, but there is always a challenge - the birthday girl loves her little dog, Nana-chan, and so the cupcakes were to be Nana-chan inspired. Roxana had suggested I do just a swirl and then add a pink ribbon of sorts, but after seeing a photo of Nana-chan, I had other ideas in mind.


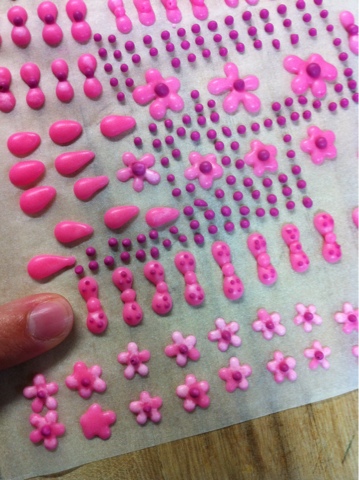
I wanted to make the cupcakes look like little Nana-chan. Nana-chan always has something pink in her hair (?) (on her ear?), so on Tuesday morning, I started with that. I piped out about a million little dots, bows, flowers and a few last-minute tongues to decorate with. It took a bit of time, but they totally made the cupcake, in my opinion. I started with some stiff royal icing and a small piping tip.

For the bows, I piped two small circles across from one another and then used a toothpick to drag the inside edge of each circle in a bit to make them touch. Once they were fairly dried, I added a tiny dot in a different color for the middle.


I also wanted some flowers. I used a similar technique, but instead of two dots, I piped five. Then I used the toothpick to bring them all in to the center a bit. As with the bows, once they were pretty dried, I used a purple-ish color to add a dot in the center of the flower.

 
Royal icing transfers can be a tad tricky, since they tend to break really easily. As a result, I made a ton of these little bows, flowers and dots and hoped that enough of them would stay intact. The fact that I made them so super tiny meant that it took ages to pipe out all of those little dots and then drag in the edges. But as above, it was so worth it!
 
 
On Wednesday, I got working on the cupcake. I had just recieved a beautiful Easter package from one of my best friends from home (thanks, Julia!!) and these cupcake wrappers were included. I adore printed wrappers, but especially with chocolate batter, they tend to bleed through the wrapper making the finished product not nearly as cute. These, however, were foil lined and kept the outside beautiful and vibrant. I am in love!
 

I mixed up the same chocolate cupcake batter as the last time. I don't remember if I had mentioned it, but I halved the recipe. With the addition of about 9 crushed up Oreos, I ended up with 18 perfectly sized cupcakes.


I knew I was going to put the cupcakes into a little stand that one of my good friends here gave me (thanks, Hitomi-san!), but the cupcake holders are a bit close together, so I wanted to make sure that the cupcake didn't go over the actual wrapper. I was careful to leave a good amount of space at the top for them to rise.


All 18 of them ended baking up just beautifully!


A few went over the top just a teeny tiny bit, but it was completely fine. Yay!


Finally, on Thursday morning, K and I made the frosting. Since the cookies were to be the same color as Nana-chan, I couldn't add in any Oreos or the frosting would turn grayish. I still used the same cream cheese frosting as last time, but omitted the Oreos. As it turns out, the frosting kind of needs the Oreos to hold it together a bit. It ended up being really soft and not too conducive to piping. I had to keep putting it into the refrigerator to cool it off and make it pipe-able again. If I ever need to do this again, I will either add more powdered sugar or look for a new recipe.


Once the frosting was made and K was napping, I got to the decorating. It wasn't difficult at all, but it was a tad on the time consuming side. First I started with a plain cupcake.


Then using a #16 tip, starting near the middle I piped about 8-10 little lines from close to the center out.


Starting in roughly the same center part, fill in the empty triangle spaces. Just so that it is obvious, I started doing the cupcakes by just piping from the center out in a bit circle, but I found the finished product looks much cuter if you do the first step as above. The photo below is from one of the early versions, so it looks a bit messy.


Then, start in the actual center and pipe a few lines from the center out covering the whole top.


Starting again in the center, make the nose/snout area. From the center of the cupcake, pipe a line going down and to the left, then one down and to the right. It almost looks like an 'm' at that point. Then pipe a few more, I usually did four, to fill in the space in the 'm'.


Finally, pipe the ears. I did three lines from the top on either side, using the same 'm' curve as above.


Where the ears start, add an M&M to make the eyes.  Make sure you place the marked side face down.


Add in another M&M for the nose. I put this one in perpendicular to the cupcake so that the nose and eyes weren't the exact same size. (I had to sift through 5 bags of M&Ms to get enough brown ones. The good bit is that we now have a whole container of only the cute colored M&Ms to snack from!)


Then if you want you can add in a little tongue. I think the tongue looks adorable, but when I was piping out the decorations, I didn't think I'd like it, so I only made a few.


And since it is Nana-chan, she needed a little flower or bow in her hair.


I packaged them up and we were ready for the party!


I only took 13 to the party, however, since that is all that would fit into the stand. The other five were for K, Y and I! Since I didn't have any leftover tongues, but really liked them, I used a red M&M instead. I don't think they look nearly as cute, but it works.


Before the party, I fed K his dinner and gave him a cupcake for dessert. He made me hold it so his precious hands wouldn't get messy - gaaa! I spoil this kid. Then he proceeded to just wipe the frosting off with his fingers and eat it. He took one bite of the cake, but was quickly over it.


K had a ball at the party. There were about 8 women, all around my age (Roxana is the only other one to have kids and hers are much older) and three dogs for him to play with. He could have stayed all night, but I forced him to go home a few hours past his bedtime. I totally thought we would leave around 9 (already past his 8/8:30 bedtime), but he never got tired or restless and I completely lost track of the time.


He played with dogs, buried himself in the dog toys, got dragged around the house in a box and went from person to person at the party playing, dancing and taking photos with them. As the only kid at the party, he was quite the star.


We both had such a fun time, it really was sad to leave. But alas, we need our beauty rest!


Tuesday, March 26, 2013

Maternity Shirt - Part 2


When my stomach started growing, I started researching maternity clothes tutorials and found that there are so many cute ones out there for us. Who knew? I kind of hate buying maternity clothes because most of them seem like such a waste. I will really only wear the clothes for a few months and then they will be done. Making some of my own seemed like a fun, cheaper way to still be clothed for the next few months.

One of the websites I found was DIY maternity. There is so much on this blog - dresses, shirts, and even a bathing suit. I liked this shirt that I found on there and made my own. It starts with a men's button shirt. It seems most people use their husband's old shirts, but alas that will never work in my situation. Instead, I searched Uniqlo for a men's button shirt with a cute pattern and found one on sale.

The first thing you do is completely disassemble the shirt.


Take the collar off and then separate the folded part of the collar from the stand, take off the pocket and the cuffs. It turns out a shirt looks pretty weird without all of these things.


The first bit of sewing is to make the arm smaller. I used one of my button shirts that I quite like the fit of to determine how much smaller to make the sleeve.


Once the arms are ready, you move to the collar. You don't need the folded part, only the stand. Since you had to take the collar apart, the top of the stand needs to be sewed back together.


Then sew a basting stitch around the collar and pull one of the threads to gather it.


Sew the bottom of the stand back onto the shirt.


Next, using elastic thread, sew a few lines just under the bust to gather it in a bit. This was my first time using elastic thread. I always thought it would be difficult, but turns out it is so easy and really quite satisfying. I think I will probably use it a few more times before this baby decides it's time to come out.


The final step is to adjust the length of the sleeve. I wanted to keep these on the longer side for some reason, but I think once the weather warms up a bit, I might shorten them even more. Cut off the bit you don't need and then pin the cuff back on.


Then just sew the cuffs on and you are done! I thought the shirt would take me ages to do with all the disassembling and such, but it was quite fast. I disassembled on a car ride to Costco and it was done before we got there. After that, it was pretty straight-forward and simple.


I like the shirt, but I am not 100% in love with it. The back is a bit baggy, I am hoping my stomach will help fill it out at some point. Also, because of the elastic thread, the front has a bit of a gap in it. For now I have it pinned, but I think it was really just an unfortunate placement of bust to button. I am thinking of putting a new button and button hole right in the middle to fix this, but I just haven't gotten around to it. One day...maybe.

Anyway, here is a profile shot of my 5-month gigantic belly. Yikes, huh?

Friday, March 22, 2013

Oreo Cupcakes


A few weeks ago, one of my good friends here told me that she loves Oreos - let's be honest, who doesn't? We had made plans to get together for lunch. She would bring the main dish and I would make the dessert. Roxana, my friend, is Mexican and I knew she would make something Mexican for lunch. I contemplated making a Tres Leches cake, but the Oreo comment stuck in my mind - Oreo cupcakes it is!
 
I started by looking for a good Oreo cupcake recipe, but couldn't find a chocolate one that didn't use a box mix. Instead I looked for a good chocolate cupcake recipe and found this one that sounded delish, my only plan for a change was to add crushed up Oreos to the batter. 
 

The batter was pretty quick and easy to mix up. Then I put some Oreos into a plastic bag and started pounding them. K came in the kitchen to see what I was doing and freaked out! "No mama!! Don't crush the Oreos, K will eat them!" I explained what I was doing, and although skeptical, he let me finish.


Once they were mixed in, you could hardly tell that they were in the batter. I might do more next time I whip these up.


For most of the cupcakes, I just added the batter to cups as per usual, but for six of them, I added an Oreo to the mix. Most of the recipes call for the Oreo to be on the bottom of the cupcake. I thought it could be cute, however, to make the Oreo like a layer in the cupcake itself. So, I added a tiny bit of batter to the liners.


Then put an Oreo on top and pressed down a bit so that the batter went up the sides of the Oreo.


Finally I covered the top with the batter and popped them in the oven.


While they were baking, I made dinner and pulled them out of the oven just before sitting down to eat. As I was making dinner, I didn't have time to make the frosting. Both K and Y wanted to eat one for dessert sans frosting, so they did. Y chose one with an Oreo layer and quite liked it. K ate up his regular one too!


I waited until the next morning to make the frosting, but put the cupcakes in bags overnight so they wouldn't dry out too much.


In the morning, just before Roxana came over, I got to work on the frosting. I used this frosting recipe because I adore cream cheese frostings. I put a bunch of Oreos into my mini-food processor and pulverized them into a powder. I was a bit worried that the cream in the middle would make it chunk together, but that didn't happen at all.


Then I mixed up the frosting, but whipped it a bit longer than the recipe suggested. I wanted it really light and airy.

Then I dumped the Oreo crumbs in and gave it another good mix.


Then, of course, I tasted it. It was delicious.


I topped each cupcake with a swirl, but for some reason, they still looked a bit lonely to me.


I didn't have too many Oreos left, so I cut a few into fourths and stuck them in the top - much better!


They were all finished up just in time for Roxana to come over. OMG! She brought the most amazing food over. We gorged ourselves on delicious tacos!


Then we gorged ourselves on cupcakes. We were all in heaven!


We started out with the regular cupcakes - no Oreo layer - first and they really were amazing. The cake was nice and airy, and the frosting tasted just like an Oreo shake. Yum.


Over the next few days, I had more of these little guys and yet I never got tired of them. I sent Roxana home with three - one for her and each of her sons, but took another one over for her the next day. I'm glad I wasn't the only one who wanted more of these. I tried one with the Oreo layer, but didn't like it at much. I think the crunchiness of the Oreo in the middle of a beautifully soft cake was kind of weird. It wasn't bad, I just didn't like it as much as the regular and really didn't think the addition of an entire Oreo added anything special to it. But it does look cute!


Roxana took this photo of me before lunch. I think a post-lunch photo would have just been me covered in red sauce and cream cheese frosting. It was a delicious meal! I rarely dream about food, but that night I had dreams about those tacos. I have issues.


K's favorite part ended up being the tiny bit of Oreo on top. He also ate the frosting off the top, but wasn't nearly as into the actual cake as he let on the previous night.