Friday, August 31, 2012

Pineapple Coconut Pops


I've totally been on an ice pop kick and seriously, I see no signs of this stopping. They are simple to make and delicious to eat!

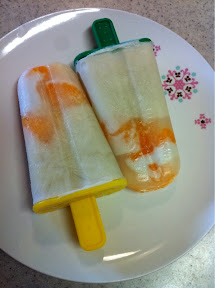
I love the coconut/pineapple combo, so figured I'd transfer it to popsicles. I started with coconut milk, pineapple juice and canned mandarins.


I wanted these to be sectioned. At the tip would be a coconut milk layer, then a coconut/pineapple layer and then pineapple juice at the top all with mandarin oranges throughout. This didn't happen.

First I tried to stick the mandarins to the mold, just like the bananas in the strawberry/banana pops, but they were too slippery and just kept sliding down. I dropped a few in anyway and then mixed coconut milk with a tiny bit of pineapple juice, just to thin it out a bit and put a tablespoon or two into each mold, then to the freezer.


I'd given them about 30 minutes to freeze and then did about a 1:1 mixture of coconut milk and pineapple juice. I put a few more mandarins in and then added the second layer.

It was at this point that I realized the layers weren't going to happen. The first layer wasn't all the way frozen yet, so the new layer started to seep in. Additionally, if I put the second layer in and froze it, how could I have fit the sticks in?!? Duh!!

In the end, I just added more pineapple juice, put the sticks in and hoped for the best.


When I pulled them out the next morning, a few hours before a friend came over, I realized they were nothing at all as I'd envisioned. I served them anyway and the boys loved them. Overall, another popsicle success! Seriously, is there any way to mess these up?!?


- Posted using BlogPress from my iPhone

Thursday, August 30, 2012

Homemade Fudgesicles


Fudgesicles. Chalk them up on the list of things I can't get in Japan. They are so delicious, and yet when I am at my parents' I always forget to get some.

As I mentioned earlier in the week, it's hotter than the bejesuses here and although I want to eat a cookie, I just can't do anything that will make me even hotter. Fudgesicles it is!!

I looked online for a recipe and found one on Smitten Kitchen. Given that I generally like the stuff I find on there, I decided to give it a look.

Much like her I was a bit concerned with the lack of chocolate in the recipe, but I trusted her and am super thankful for that!


I followed the recipe except I used dark chocolate and dark cocoa powder. It's all I had on hand and I like it more than milk chocolate on occasion. You can hardly see how much chocolate there is, seriously it's a very small amount - 21 grams.


Melting it did nothing for my doubts, in fact I'm pretty sure that made them worse. After adding a the other ingredients, I was starting to feel a bit better about the situation since it looked and smelled phenomenal.


While I was letting it cool a bit before putting it into the molds, I couldn't resist taking a taste.


It didn't stop there. Yikes!!! This stuff is amazing!!!

I poured it into my molds, but it wasn't enough to fill them to the top.


I'm not sure the cause of this -- shoddy pouring? Big molds? Too much tasting? I'm guessing the latter, but the jury is out until I do round two, which will likely be soon.

As a result, the stick didn't go all the way into the Popsicle and then separated when I tried to take them out.


It was a bit of a pain to have to dig my fudgesicle out as if it were some buried treasure, but it totally worked and I'm sure the taste was unchanged.


Seriously, these are delicious. Amazing, really. I may or may not have just eaten the others straight out of the mold. Screw the bowl and proper eating etiquette. I can't wait to eat them again!!

- Posted using BlogPress from my iPhone

Wednesday, August 29, 2012

Birthday Cake Slice


I've posted before about the little girls I teach English to, and their love for felt foods. Usually they "buy" foods I've made with points from the lesson, but birthdays are a separate deal. The girls are young, so birthdays are still exciting for them. As a result, I thought it'd be nice to make something special for the first birthday girl of the year.


This little slice of birthday cake was quite simple to do.


I started with a long rectangle for the cake and a triangle for the cake bottom, a smaller rectangle for the frosted back of the cake and a triangle for the top, and finally two thin rectangles (it really should have been one, but I didn't have a long enough pink scrap) for the frosting in between the layers.

First I sewed the frosting rectangle to the middle of the cake rectangle.


Then I sewed the triangle bottom of the cake to the main piece. It was at this point that I realized that cakes usually aren't perfect rectangles, so I curved the short end a bit. This was a tad difficult to do after it was sewn on, I recommend cutting it this way from the start. This is what the top looked like post cut/pre-sew.


Then I sewed on the frosting rectangle and then sewed on the top, stuffing it before sewing it completely shut.


It's fine, but kind of boring. Birthday cakes need candles!


I cheated on this and didn't actually sew, just hot glued it together.


I also added a circle of Velcro to the bottom of the candle and top of the cake.


It was looking better, but it was still missing something. White frosting details could do the trick!

I cut a rectangle, sewed the end shut, and then started sewing down the long edge. Once I got about a fingertip from the edge, I stuffed it a bit and then sewed that section closed.


I did it two more times, until it got to be the same length as the edge of the cake. Then I sewed it onto the cake and done! A birthday cake slice is ready for the birthday girl -- she comes tomorrow, I hope she likes it!

Now I have to make two more for my other cuties!!


- Posted using BlogPress from my iPhone

Monday, August 27, 2012

Simple Frozen Yogurt Pops


It is still way too hot around these parts to be baking unnecessarily. I've been craving something sweet, however, so I needed to make something. Enter frozen yogurt pops.

Ages ago, I saw popsicles with fruits and thought they were the cutest. I took my chances with strawberry banana ones. These were so easy, I kind of feel I shouldn't even post about them, but given how cute they turned out, I can't resist.


I started out with a 250g container of strawberry yogurt and two (old) bananas (even though only one is pictured). I also used a popsicle mold that holds four little guys, although I think you could use paper cups with popsicle sticks or maybe even cupcake liners.


Slice one banana into 12 thin slices. If you have a big banana, you may have some left over, not to worry, it will be used.


Put the yogurt, one full banana and any leftovers from the sliced banana into a mixer and mix until smooth.


Stick three banana slices onto the wall of each popsicle mold. I wasn't sure if they'd actually stay put, but surprisingly enough, it worked!


Carefully pour the yogurt mixture evenly into the mold. This amount of yogurt fit my mold perfectly. Lucky!! If you have leftover, you could always freeze it into cupcake liners and have minis to snack on or more likely, just eat it.


Put the caps on, then pop them in the freezer and in a few hours you will have adorable, delicious frozen yogurt pops!


- Posted using BlogPress from my iPhone

Thursday, August 23, 2012

Umbrella Stroller Bag


After a lovely vacation, we are back in Japan and jet-lagged as all get out. I've been sleeping whenever K sleeps, so I've had zero time to bake or sew. The good news is that I did a few projects while at home and had a few up my sleeve, so I'll be back to posting regularly. Thanks to all of you who checked often, regardless of my laziness.

While we were in the US, we had a lovely two days in Chicago planned and all of it went to pot due to a flight cancellation. In preparation for our mini-trip, however, I bought an umbrella stroller - perfect for carting around a city and using in museums.

It definitely needed a cover, however, as K also likes being held. A lot.


I immediately thought of a yoga mat bag that I'd made for my yoga instructor sister-in-law. Essentially it is a long tube of fabric with a line sewn in the middle. You simply roll the mat up, put it in the tube, then tie the ends together and sling it over your shoulder. The line in the middle of the tube stops the mat from sliding around.

I figured I could do the same thing with the stroller bag. Once I laid the fabric out, however, I realized that it wasn't going to be long enough.


Whoops. Luckily, it was plenty wide enough. I ended up cutting it about 2/3 of the width all the way down the length.

Using the wider piece, I double folded one of the short ends under so it doesn't start to fray as the stroller is taken in and out many times. Then I sewed a French seam down the long side. It got a tad tricky, as there was a heap of fabric bunching up, but certainly doable.


At this point, I'd like to apologize for the awful photos. It was 11pm as I was making this and my parents were sleeping in the next room. I was trying to just get this done quickly, (so I could get to bed) in the dark (so I didn't wake the 'rents).

Back to the bag...the difficult part is now done. The next thing was to fold the smaller piece in half and sew right sides together, leaving one short end unfinished. Then flip right-side out and you've created the other half of the bag.

Finally, connect your pieces. Since one is much wider than the other, I ended up folding the wider piece into thirds and connecting the two unfinished ends with another French seam at the bottom.


Then just slip the stroller in, tie the top ends together in a knot and throw it over your shoulder. Done and done.


Thanks to my little brother for modeling!!


- Posted using BlogPress from my iPhone

Friday, August 10, 2012

Lemon Mint Ice Cream


K and I have been in the US for exactly one week now and it has been glorious! We have been enjoying the warm weather, the delicious foods, and more than anything else - our family. K has fallen in love with my parents and cousin, as well as my brother and his wife (as of yesterday). I haven't been sewing or baking much, just enjoying my family.

My mom had a magazine from the farmer's market that has recipes, recommended area restaurants, breweries and wineries, and information about organic foods and where to get them around these parts. One of the recipes my mom had talked about trying since I arrived was a lemon and mint ice cream. I don't know why, but every time I imagined it, it was more of a sorbet. It sounded quite nice, but also a tad on the normal side. When I finally looked at the recipe and realized it was ICE CREAM, I was super into it!!

We started out with our lemons and mint. Then chopped the mint with some sugar, grated the lemon peel and then juiced the lemons. The kitchen smelled amazing - a lovely start.


From there, we added the rind and mint to sugar, whipping cream and milk, gave it a stir, and then refrigerated that mixture and the lemon juice for 3 hours.


I was super excited, but decided to take a nap. When I woke, my mom had already put the mixture into the creamer and it did its thing. What a lovely way to wake up from a nap!


We had a small bowl of it, and it was really nice. Refreshing and kind of light, but hardly sweet at all. I don't know, but it turns out I like my ice cream to be sweet. My mom had some simple syrup in the fridge (as you do). We added that to the mix and it turned from nice to DELICIOUS! My mom said that the next time she makes it, she will probably add more sugar to the initial mixture. I kind of liked the syrup addition and think I'd do it the same next time around.


Wednesday, August 1, 2012

Little Boy Muscle Tee


Ages ago I came across this muscle tee and fell in love with it. For some reason, little boys in muscle tees make me giggle. I think they look adorable.
I needed to make one for K. I figured I could use a (store-bought) muscle tee from last year as a pattern, but I was sorely mistaken. It hardly fit over his head and was way too short. Turns out, K has grown quite a bit in the past year.
At that point, I remembered that we had some tank top onesies that were given to us by one of Y's co-workers when K was born - they only now fit (size 95). For the record, the co-worker's girlfriend gave us a few outfits that fit when he was first born - men are funny.

I didn't want to make his new tee a onesie, so I traced the top and sides and then used a current t-shirt to decide the length.

From here, it was super easy. Cut out a front and a back on the fold and then sew the tops and sides together.

To make the top seam a bit stronger, I cut out a small rectangle to sew into the seam. I also sewed a second line at the top.

I always have issues sewing with knits (t-shirt material). Either the machine eats the starting point or the seams get wavy and weird. I worked out that if I have some way to support the fabric, this might not happen. I put tissue paper under the fabric and sewed right on top of it - worked like a charm! You do have to rip it out of the seams, which takes a tiny bit of time, but for me it was worth it.

Once the shirt was essentially made, I sewed knit bias tape (pre-made/store-bought) to the top and arm holes.

Since the tee is made of knit, the bottom doesn't need to be hemmed, but I did want it to look a bit more finished, so I cut a long rectangle of fabric and sewed it to the bottom with a double seam.

The final step was the pocket. It, also, was super easy. Just cut the shape, I folded the top over and finished with a seam, then hand-sewed it to the shirt, sides left unfinished.

I wanted the pocket stitches to look a bit messy, so as to add a bit of character.
I L-O-V-E how this turned out. I think it's absolutely adorable. K seemed quite chuffed with it as well. I put it on him before heading out for the day. I have no idea why, but he insisted on wearing his galoshes (it was a hot, sunny day) and Y's hat.

I knew the galoshes would be off within minutes of leaving the house (seriously, it was baking that day), and luckily brought a second pair of shoes along. Thank goodness.

- Posted using BlogPress from my iPhone