Friday, August 30, 2013

Super Simple Baby Blankets


When K was a tiny baby he hated being swaddled. He was also an awful sleeper. Before baby T was born, I was dead set on the fact that he would be swaddled and he would like it. I thought that maybe swaddling T would help him sleep better. So, before T was born, I did some research into what type of blanket is best for swaddling. I know there are specific swaddling blankets, in fact I have a few different ones (that K hated), but I thought for how expensive they are, if the baby hates being swaddled it would be such a huge waste. I would do this the old-fashioned way!

I found that 1 meter by 1 meter is a good size for a blanket and given that it is hot, hot, hot here I thought a thin gauze would be nice. So, before T was born I headed to the fabric store and got 1 meter each of two fabrics.


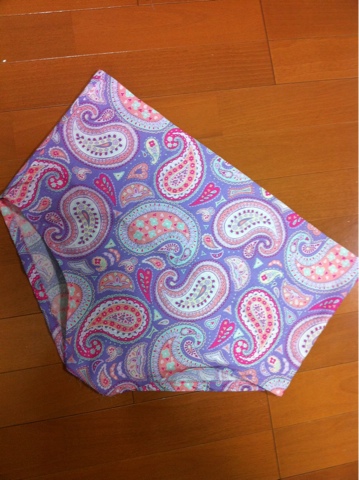
The blankets were super simple to make. I just washed the fabric and ironed it. Then without measuring, I ironed the edges in twice, about 2.5 centimeters each time. Without even pinning it, I just sewed on the very edge of the fold.


When I got to a corner, I went all the way to the edge of the blanket, turned to follow the edge, turned again at the corner and one last time to make a square.


I think each blanket took less than 15 minutes from ironing to finished product. They look pretty simple, but I wasn't going for anything crazy here. I figured simple would be best.


It turns out T hates being swaddled as well. He might also be the next Houdini. He has broken out of every swaddle I've ever put him in. In fact, he has even broken out of the swaddles when I've used the actual swaddling blankets that I had bought for K. I don't know how, but he got his legs out of the pocket and arms out of the blanket and then had the whole thing wrapped around his waist. It was fairly impressive.

Luckily these blankets aren't a total waste. I use them to simply cover him up or for him to chill on. He seems pretty oblivious to them.


In other news, I have been seeing more and more neighbots recently. The other day as I was taking out the trash, I saw a little neighbor boy and his mom. The mom asked about the T - was it a boy or a girl, etc. The little boy then goes, "Wait! You already had the baby? Why is your tummy still big?" The mom explained that it takes a while for the mom's tummy to shrink back down. I felt like saying, "Listen kid, it's been two and a half weeks. Cut me some slack!"


Wednesday, August 28, 2013

Banana Nutella Muffins - Part 2


Ages ago I posted about some Banana Nutella Mini-Breads that I baked up. They were delicious, but as I mentioned in the post, I totally regretted not swirling Nutella on top. This time I did it and it was definitely worth it!

I didn't take many photos of the actual mixing process because it was the exact same as the previous Banana Nutella post. The recipe was the exact same as well - my trusty Emeril recipe with the odd little adjustment here and there. I froze little Nutella bits for the middle, as I did the last time, and put them in after filling the cup about halfway.


Then I filled the cup up and added a drop of (unfrozen) Nutella to the top.


Then I gave the tops a quick swirl and they were ready to pop in the oven. As you may notice, only half of cupcakes got the Nutella topping. I was running low on Nutella, so I made six like this, then threw some chocolate chips into the batter and did the rest as just banana chocolate chip muffins - also delicious.


I think they looked quite cute once they were baked.


With Nutella in the middle and on the top, you are almost guaranteed a nice Nutella taste in every bite - yum yum!


Friday, August 23, 2013

It's a Boy!!


It's a boy!! I have been a tad bit absent from the blog recently, but with good reason - I am now responsible for two little boys' lives. Sh!t just got real. Little T was born just before noon on August 11.


It turns out that little T is not so little. He weighed 3682g when he was born (500g more than K) and was 50.1cm long. We had a lovely stay in the hospital, but after four days we were ready to head home.

K adores T. On our first night home, K decided to take it upon himself to teach T how to hold his legs up on his own. He kept picking up T's legs and letting go, T's legs would inevitably fall to the ground each time. K then exclaimed, "I have an idea," ran to his train track, and grabbed the bridge supports. He then, very carefully, balanced T's tiny ankles on them. It took all of my strength not to cry from either laughing so hard or seeing how much love K has for his little brother already. K's an awesome big brother.


Just like any baby, T's little face is changing so much each day. I'm pretty sure this is my favorite photo of the little guy so far.


His hair changes every day as well. Some days it sticks straight up, other days it is swept to the side, but my favorite style so far was his fauxhawk, which I unfortunately did not get a good photo of. This 'do is pretty stylish though, and you get the bonus of sleeping baby smiles.


K and T spend a few minutes each morning just staring at each other. Sometimes K insists on laying in bed next to T, other times a safe distance from the sofa to the floor is kept. I think this time might be one the best parts of my day.


We had T's 1-week (after discharge) check-up today and the dude is growing. He is up to 4110g and is 52.9cm. It might not seem like too much, but it is quite a jump. The doctor said that babies should gain about 30g per day, but my little munchkin is up 63g per day - yikes! He likes his milk...seems a tad bit unsure of the pacifier.

 
Now with two little guys to take care of, I am not sure how often I will be blogging. I would still like to keep up with my twice a week deal - one baking/food related post and one sewing/creative post - but I am just not sure it will happen every week. I do have a few posts saved up from before the little man's birth, but I am pretty beat since T has yet to work out days/nights and I can't just nap all day - K needs some love too! So, bear with me and be sure to keep checking back. I am still here, just not as often as I might like. 

Tuesday, August 6, 2013

Birth Day Cake??


OMG! It is hot. I am uncomfortable. I want this baby out of my body.

We asked the doctor if there was anything we could do to speed up the process, but he just kind of laughed and said that outside of medicine we are out of luck. He did recommend walking a few weeks ago and I have been walking about 6 kilometers a day, sometimes twice. Y and I even climbed the 14 flights of stairs in our condo the other night. After our appointment on Saturday, my friend  sent me a link about a "labor cake".  (Thanks, B!!) Apparently the idea is that chocolate might bring on labor - sounds as good as any other random idea out there and hey, it's cake!

The problem with the recipe in the article is that it calls for both a Devil's Food cake mix and a box of instant chocolate pudding. I won't be able to get either here, at least not without some major searching (my mom, who is visiting, won't let me leave my neighborhood in case I go into labor, so that's not happening) or paying a lot of money for it and then having to wait for it to be delivered. Instead I tried to think up the most chocolatey cake I could remember and I came up with a perfect one, which happens to be Y's favorite!

The recipe is written in the link above (just click on Y's favorite), but it starts with eggs and sugar, flour and cocoa powder, and butter all in separate bowls.


You mix the eggs and sugar for 8 minutes. My mom and I split the work.


Then fold in the dry ingredients and finally the butter.


Throw it in a pan and bake that bad boy up.


While it is baking you have to get cracking on the truffle filling. Melt cream and chocolate in a pan.


Get it so it's nice and smooth and all mixed together.


Beat more eggs and sugar over a double boiler for 6 minutes to cook up the eggs a bit. Pull it off the heat and add the melted chocolate. Beat for another 6 minutes and then cool it in the fridge.


By that point, the cake should be done. It should have pulled away from the pan while cooking, but if it didn't (mine didn't this time), give it some help with a pallet knife around the sides.


Once the cake and the filling have cooled a bit, slice the cake in half horizontally. Wash up the cake tin and then put the bottom layer back.


Cover the bottom layer with half of the truffle filling.


Top with the second layer of cake.


Finish off with the last of the filling and then put it in the fridge for 5 hours. The goal is to have the filling flow down the sides of the cake, so before putting it in the fridge, I give it a few good slams in hopes that will help - it's always worked.


My mom and I ended up waiting 3 hours. Dude, it was getting late and I needed to at least try to go into labor last night. I pulled the cake out of the tin and plated it, but I didn't like how the sides looked.


Once I ran the pallet knife over the sides, I thought it looked much better.


So shiny and sleek from the top.


Then we cut into the cake and gorged ourselves on dark chocolate. Yum. Fingers crossed my contractions start soon - my mom leaves in two weeks!! That being said, I had a piece of the cake last night, one for breakfast and I am about to have another right now. No signs of baby yet, but my fingers are still crossed!!

Friday, August 2, 2013

It's Summer, Baby - Part 2


Yesterday I posted about the little romper I made for my friend's baby girl. I decided that since it had such little coverage, the precious little baby might need a matching sun hat. I had made a similar hat over a year ago, so I used the same pattern only I made a straight brim instead of a ruffled one. 


It is really simple to piece together. Sew three of the triangle pieces together to make half of the hat.


Then sew them together, making sure the very middle is all lined up. This seems way more challenging that it really is.


Do the same with the lining of the hat, and you are nearly done.


Sew the brims together.


Flip them right-side out.


Iron it all down, and your brim is finished.


Baste the brim to the outer layer of the hat. The pattern didn't call for straps, but I thought they might be helpful. I made two of them and then basted them to the hat at the same time as the brim.


Tuck the brim in and sew on the outside of the hat.


Flip it all out and then sew up your hole (it was left in one of the cap seams of the inner layer). Then you are done!

 
I think it is so stinking adorable by itself or paired with the romper. Eeek!!
 

Happy summer, baby!!

Thursday, August 1, 2013

It's Summer, Baby - Part 1


It is no secret on this blog, that I find baby girl clothes adorable and such fun to make. Given that I don't have a baby girl (in a few days, maybe? Then again, maybe it will be a boy...), I am lucky in that I have friends that have daughters. Ages ago, I made up a bunch of little things to welcome one of my best friend's babies into the world. Now that summer is upon us, I decided another little outfit was in order. I came across this little romper from a blog I quite like and decided that would be the one! It's is so stinking cute - how could I pass it up!?

I started with a 6-9 month onesie, placed it on the cloth and started cutting.


The tutorial says to cut the leg holes so that the front one is more rounded than the back. It seemed to make sense given that this is how the original onesie was cut as well.


Then you finish the edges, I just used a zig-zag stitch to make sure nothing falls apart.


Sew the sides together and then fold under the legs to make a casing for the elastic to come later. Hehe, it looks like a huge pair of undies!


I thought the next step would be quite simple, and it was, but it took AGES!!! You have to smock the top. I used elastic string, which I had done before, but it ended up taking so super long since I had to sew maybe 9 or 10 lines and also move super slowly while doing it. Then I brought all the strings to the inside and tied them off. Man alive, this took way longer than I had anticipated and was way more finicky.


 But look - it's adorable and so worth it!!!


Next I added some little tie straps to the top, as per the tutorial.


And a little tag to show mylove. I really need to invest in garment labels.


The top was done and all that was left was to finish the bottom off.


I sewed up the leg casings and strung the elastic through sewing it down at each end of the leg. This was a bit difficult given that I have never actually met this baby, so I really don't know how big her legs are. I figured I would just eye-ball it and hope for the best. The final step was sewing on the snap tape. I'd never actually used this before, but it is awesome! There is really nothing to it.


Just sew it on and done - diaper changing made easy.

 
 I adore this little romper and hope the mini-recipient likes it too! That being said, it seems a bit chilly where she lives. Maybe Mommy could put a little onesie on under to cover up those tiny arms a bit.