Monday, March 11, 2013

Preschool Prep


In less than one month at the ripe age of two, K will start preschool. The school year starts in April and you can start pre-preschool (two days a week) the fiscal year you turn three. K turns three at the end of April, putting him at the older end of his class. But to me, he still seems so little. The bus will pick K up at 7:53 and drop him off at 2:26. This is going to be a huge adjustment for both of us, but he's going to love it and I'm going to love the time to relax and focus on the new baby.

For preschool K needs a number of bags and such that parents have the option of buying or making. I'm sure you can guess that I'm opting to make them. K, Y and I went to the fabric store together and I told K that he can pick out any fabric he wants for his school bags. He couldn't decide between Thomas, cartoon Shinkansen, and the more realistic Shinkansen. We bought them all, as well as some lining and accent fabrics. Ahhh, so fun.

I started by making his book bag, not to be confused with the school backpack. This bag is solely for books. The school gave us loose sizing guidelines for this bag. I followed them adding a few extra centimeters on either end for seam allowances, as well as for any mistakes along the way (see below).

The cartoon Shinkansen was the cutest fabric, in my opinion, so I chose that for this bag. I cut out my rectangles for the outside of the bag, as well as the lining and then two rectangles in the accent fabric to go at the bottom of the bag.

 
I started with the lining and sewed on a small pocket. Pockets are always useful - tissues, cars, trains, who knows what K fancies on any given day.

 
Then I got to work on the outside. The Shinkansen fabric was much thicker than the accent fabric, so I thought it would be best to just sew the dots onto the Shinkansen base to keep the strength of the bag - it is for his books, after all. I was a complete airhead doing this, however, and sewed the dots on one centimeter too high, so I had to cut off the bottom centimeter of the Shinkansen fabric. Good thing I had the foresight to give myself some wiggle room when I cut the fabric.

 
Every bag, crayon, article of clothing, etc. must be labeled with the child's name. I had Y write out the labels because of course his writing is much nicer than mine. Then I sewed the name tape onto the front of the bag. My new sewing machine can do stiches other than just straight and zig zag, so I had a little fun picking out an edging for the name tag. K sees railroad tracks in anything, and I thought this edging would be no different.

 
Then I basted the straps to the bag and sewed the tops of the lining and outer together.

 
Then I lined up all of the fabrics and sewed around the edge leaving a hole on the side of the lining for turning.

 
I flipped and stitched up the hole. In the morning, I showed the bag to K and he was stoked. He loved it.


Because I think it's adorable, here is a photo of K in his uniform. I had to do some minor adjustments, and hadn't yet done them when I took this photo, but I don't think you can tell too much. Eeek!! My baby's wearing a uniform!!

Friday, March 8, 2013

Chocolate CHIP Cookies


Yesterday K woke up from his nap and immediately asked for cookies. It was a tad strange given that he never asks for cookies, especially just after waking up. He must have been dreaming of them! I told him that we didn't have any cookies. His response? "Let's make some, mama." I LOVE that he wants to bake and realizes that we can make cookies that are just as tasty as any cookie we could buy at the store. I looked through our cabinets and found that we had all of the ingredients (sans bread flour - which I am pretty sure I've never had in this house) for Alton Brown's "The Chewy".


I have mentioned a few times on this blog that very rarely can I find actual chocolate chips in this country and when I do, they are always exorbitantly priced. I always settle for chopped up chocolate bars. Not today, my loves, not today. While I was piping out the faces on the bear macarons, I realized that I could just make my own chocolate chips by melting and then piping out little dots. I started by breaking up four chocolate bars, adding a bit of shortening, and melting it on low heat.


Once it got almost melted, but with a few chunks still thrown in there, I stirred until everything was smooth. As you likely know, if you heat the chocolate until it is smooth, it overheats and then turns all gross - don't do that.

Once melted, I put it into a piping bag with the smallest tip I own and piped out what seemed to be a million tiny dots of chocolate. I did not anticipate this taking as long as it did. While I love the chips, I'm not sure how many times I will make them in the future. Anyway, I popped them in the refrigerator to cool for a few minutes while we mixed up the dough.


The dough, while not difficult at all, did dirty a number of bowls - one for butter and sugars, one for liquids and one for the dry ingredients. More dishes to wash always bums me out a bit, but these cookies were really good, so I'll excuse it.


You add the liquids to the butter and sugar and give it a mix.


Then you add in the flour and it starts to resemble cookie dough.


This is what my little chocolate chips looked like before adding them to the cookies. Not the same shape as your standard Toll House, but they were little circles! And so super cute.


Finally you stir in the chocolate chips.


A few of mine started to melt, you can kind of see swirls of chocolate in the dough, but just as well.


K and I didn't get around to actually making the cookies until just before dinner. I promised him one for dessert, if he ate a nice dinner. While the dough is meant to sit for one hour in the fridge, I made three small cookies - one for K, one for me and one for Y - before chilling.


Unsurprisingly, K ate a big dinner and was so excited to eat his cookie.


Y hadn't finished his dinner yet, as he had just gotten home, and K begged and begged for Y's cookie. I told him he could have some more tomorrow. He woke up this morning and immediately asked for a cookie. Dear me.

Thursday, March 7, 2013

Custard Rolls (クリームパン)


The other day, one of my English students brought me a few pieces of bakery bread that her mom had bought just before the lesson. After the lesson had finished, K begged and begged for a piece of bread that the student had brought, so I let him pick one out. Naturally, he picked out one of few sweet ones - that's my boy! He ate about 3/4 of the custard roll, クリームパン, in Japanese. When Y got home from work, he ate the last bit of the roll, said it was delicious, and then asked me to make some. Uhhh, sure!

I started off with the custard. I found this recipe and decided it would likely work as a bread filling. It starts with putting most of the sugar and all of the milk into a saucepan and letting it boil.

 
While that is on the way to boiling, you whisk up the eggs, remaining sugar, and cornstarch. Once it is all mixed and smooth, you add a bit of the milk mixutre to the egg mixture to temper it.


Once it has tempered, you add it back to the pan and then cook it until it thickens. Once thick, add butter and vanilla and stir until it is melted.


Then put the custard into a container and cover with plastic wrap, making sure to press the wrap onto the surface of the custard so that a skin doesn't form. Then refrigerate until it is cooled. This seems like it is a bit of a process, but it really is so quick and easy. If you are in the mood for some custard, this one could definitely do the trick!


While the custard was cooling, I got onto the bread. I used a "sweet bread" recipe from my breadmaker book. As I've mentioned before, I won't bother posting the recipe as all breadmakers are different. I imagine any type of sweetish, fluffy bread would work well.

Once the dough was ready, I cut it into eight pieces and got to filling!


I took each piece and kind of rolled it out with my hands. For the last few, I found it was way easier to put the bread on the table and flatten it out. Then I added some custard.


And finally I pinched the bottom shut to enclose the custard.


I put them pinched side down on the baking sheet.


Once they were all filled and pinched, they were ready for rising. I always underestimate how much bread rises. This is the "before rising" photo.


And this is the "after." They got massive. I was kind of bummed, as I do like my sweets to be on the small side, but it was a tad late to go fixing it. I probably could have divided the dough into 10 or maybe even 12 and it would have been fine. Next time, right?


When I pulled them out of the oven after baking, I was so sad to see that some of the custard had leaked out. I assumed that with all of the leakage, there would be no custard left inside. I had Y eat one, and as it turned out there was still plenty of custard on the inside. Apparently, I just put a bit too much in each roll.


I was also sad that the leaking custard looked gross. I cut it all off, however, and no one would be the wiser. We had them as snacks for when one of K's friends came over the following day. The boys didn't each much of the bread, but the other mom and I certainly did. Then I had one for breakfast the day after that too!! Maybe I'll have one of the last for tomorrow's breakfast as well...yum.

Monday, March 4, 2013

Maternity Jeans

 
About a month ago, I wrote a post about a maternity shirt that I made. Shirts are great, but they are also stretchy and many are on the longer side to begin with. What I really need - like now - are pants. I have one pair of black cords from when I was pregnant with K, as well as a pair of jeans that were my sister's when she was pregnant 8 years ago. They look 8 years old. I took a look at those old jeans and realized that it wouldn't be that difficult to just make some from a new pair. I looked online, but couldn't find a tutorial for exactly what I wanted, so I decided to just charge it.

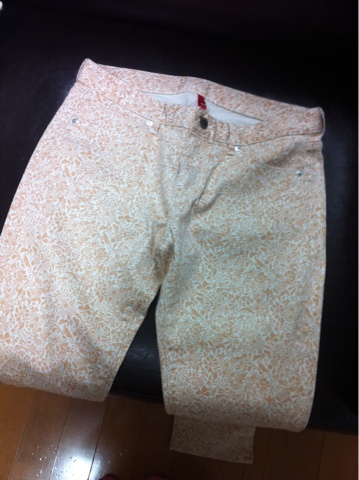
I really want a new pair of regular jeans, but there weren't any on sale in the women's section of Uniqlo. While I was pretty confident my idea would work, I was just a tad unsure and didn't want to ruin a new pair of jeans - not that Uniqlo is expensive, but why throw away more money than necessary. I took a look at the sales and picked up a cheap pair of patterned jeans. I'm a little nervous about them. I like the idea of patterned jeans, but I am not really sure about pulling them off well. Regardless, I bought them! 

They started out as just a regular pair of jeans in my regular size. At Uniqlo you can have pants hemmed for free and in usually about 30 minutes, so while I couldn't button or even zip them up, I pulled my sweater down low and called the dude over to fix the length. Then we went and had lunch, picked up my jeans and headed home.


The first thing I did was carefully cut out the zipper.


Then I cut a huge semi-circle from almost the very bottom of the fly up to fit my ever-growing belly. I wanted the back of the waistband to be intact since shirts often ride up leaving that part exposed. If at all possible, I wanted these jeans to look like regular jeans (who would I be kidding!?!). As a note, the pocket pictured on the right looks like I cut it out completely. I did not - the pocket lining just folded over.


To keep the pocket lining from folding over while I was sewing, I did a baste stitch to keep it attached to the denim.


Then I took a piece of white jersey, wrapped it around me and marked where the end met the rest of the fabric, i.e. I took a measurement of my stomach the super lazy way. Then I cut a rectangle with that length and a height of about 40 centimeters. I folded the rectangle down so that it was now only 20 centimeters high and zigzagged the raw bottom seam together.


Doing the same tube thing that I did to make K's circle scarf, I pulled one end into the other. Then I sewed the raw end together, in the same way that I made the scarf, only I left the opening at the very top edge so I could insert elastic at the end.


I lined the raw/zigzagged edge up with the cut edge of the jeans and was really lucky when they almost perfectly matched up. It probably would have made more sense to measure the diameter of the cut jeans and then cut the fabric to match (or cut the fabric a tad smaller to make it a bit tighter), but I didn't think of that until I realized that I would have been in a bit of a pickle if it, by chance, had not ended up so perfectly.


Once that was sewed on, I flipped it up and saw that aside from the elastic at the top, the jeans pretty much looked how I had wanted them to - success!


The final step was to put in some elastic, I bought really thick elastic as I thought it would have more holding power. Again, I very scientifically measured my stomach by wrapping the elastic around and cutting it a tad short to get the waistband snug. I probably could have made it even tighter, but I didn't want to bother with fixing it and I figure it works fine, and will become snug soon enough.


From the front, I don't think you can tell they are a total hack job. They look like regular jeans. Yay!


Take off a couple of layers of tops, pull up the shirt a little, and it becomes quite obvious that I am pregnant. That being said, we went to the doctor on Saturday morning and everything looks great. The baby is growing perfectly, we saw the heart, brain, spinebone, leg bones, arms, hands and fingers. I am only 17 weeks and pretty big, but it has been confirmed on many occasions now that I am NOT carrying twins.

 
As a side note, do any of you have any suggestions of what to wear with these jeans?! I am so lame.

Friday, March 1, 2013

Sugar Dots

 
Last night I posted about a polka dot cake I made the other day. I was so excited to write about it, that I kind of started at the end of the process. Before starting the cake at all, I first made the sugar dots that decorated the outside of the cake.

I saw this tutorial online about making ombre sugar hearts to give away as wedding gifts or to decorate a cake. I knew they would be perfect on my cake, but I wanted bright, bold colors instead of ombre pinks.

I started by picking five colors out of my gel stash. K wanted to help, so I guided his picking of the colors, "hmmm, what do you think about this one, sweetie?" was said about four times - he picked the yellow on his own.

 
I mixed up my meringue powder and water, grabbed the sugar and my pink gel. I started out with 1/4 cup of sugar to 1/2 teaspoon of meringue mixutre.


I got the pink mixed in really well, which was not a simple task. It took a bit of work to break up the clumps of gel and sugar. It looks so pretty in the end!


Then I mixed in the meringue, emptied the colored sugar out onto parchment paper, rolled it out and started cutting away. Since the mixture is kind of wet, the sugar didn't always hold it's form. It was a bit tricky to move the circle over to the baking sheet without the circle breaking, but once I got the hang of it, everything worked out just fine.


Because my circle cutter was pretty tiny, it took AGES to cut all of the circles out. Additionally, it made tons of circles, when I knew I probably only needed about five of them. I lessened the sugar and meringue mixture for the other colors (except purple - I was still unsure of the pattern I would do on the cake and pink and purple make me think of my friend) - 2 tablespoons sugar to 1/4 teaspoon meringue. Once the pink was ready, we moved to the next color. K, of course, wanted to help. He worked on the blue, while I did the purple.


Because he is two, there was of course a spill. It wasn't too bad, so I didn't worry about lessening the meringue mixture once the color was all mixed in. Also, as I mentioned above, mixing the color in is not super easy - this kept the kid busy for like 10 minutes!


Eventually I got all of the circles rolled, cut and placed on the baking sheet. It did take a bit longer than I expected, but I suppose it was somewhat my fault in that I made SO many. Lesson learned! I love how they look glittery almost. They are so super pretty.


I baked at 100C for 10 minutes and then let them sit in the oven over night. The next morning, I emptied them out into a little baggie. They were perfect! Nice and hard - just like a sugar cube.

 
My friend came over last night for a slice of cake and we got to talking about the dots. I think they would be so cute to use as sugar cubes in a cafe or just when you have guests over. Due to the whole pregnancy situation, I'm not drinking any coffee and Y drinks his black. My friend graciously took a few to try in her coffee this morning. She took a video and sent it to me today. They dissolved just fine in the coffee, but eventually started to make a weird dirt-like substance. My friend thought maybe it was because of the protein of the meringue powder mixing with the coffee. Hmmm...I have no idea, but maybe I could substitute water for the meringue powder? It might be worth a try!! I'll of course keep you updated.