
I haven't mentioned most of them on this blog, but there are five kids in my family, four of whom are married (including myself) and three of us have kids. Add those add those 11 people to my parents and that is a whole lot of Christmas presents to buy. For the past few years, we decided to do a present exchange; a month or so before Christmas my brother's mother-in-law emails each person individually with information for whom to buy a present. We only include the adults in this, the little kids are fair game.
K is one of the kiddos (and got many lovely presents - thanks guys!!) and my 6-year old niece is the other. I bought her some super cool glitter boards, but given that she really loves cats I thought it would be nice to make her a cat of sorts. I found a pattern for a cat pencil case in one of my sewing magazines and thought it would be perfect. Both she and my sister are quite into handmade things!
I started by cutting out all of the pieces - four ears, body, tummy, nose, back, and lining fabric.

The first part (and the bit that took the longest) was to get the front design down. I started with the tummy and blanket stitched it to the body. Next came the pocket on the tummy. As I learned with Totoro, pockets are cute! Next was the collar, then the nose.

The final detailed bit was to finish up his face. He got two button eyes, a mouth and tiny lavender whiskers that are just barely visible.

Eeek! He's so cute!!

I wanted to put something in the pocket, but couldn't really decide on what. I finally settled on a tiny purple heart button attached to a braided thread so that it couldn't escape. Everything on the front was done by hand and took me forever to do. I don't know if I was just really slacking or what, but by the time it was done, I was stoked.

This is how the little guy looked with his ears placed. I think he's adorable - and I don't even like cats!

The next step was to prepare the zipper. I sewed a scrap of fabric to each end of it. I had never seen this done before, but LOVE how it looks in the back - so super cute!

Then I sewed the zipper to the back fabrics, topstitching once it was all sewed on properly.
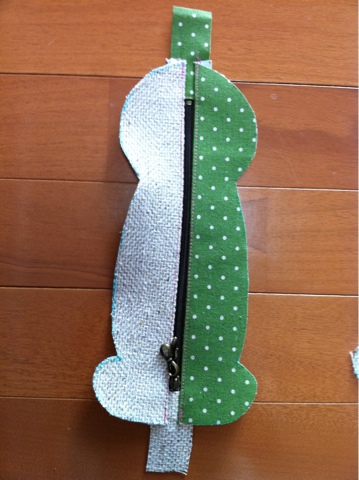
Finally I trimmed the ends of the zipper fabrics and he was ready to go.

I sewed the main bag together. Perhaps I sewed a bit too far into the bag, because homey got pretty skinny. I trimmed a bit of the excess and cut slits around the curves.

Then I flipped him right-side out and realized his collar wasn't really up on his neck. Boo!!! I seem to have forgotten to take a photo of this, but I was really unhappy with the collar placement (although looking at it now it seems quite fine), so I hand sewed a strip of lace above the pink pompom trim. I really didn't want to take the whole bag apart to deal with this, so I just sewed it all the way around, from one side of the zipper to the other. Oh well.

The final steps were to sew the lining together and then to hand sew it to the zipper so that it was nice and secure in there.

And just like that, the pencil case was done!

It looked a tad lonely, however, so I added a few pens, pencils, erasers and stamps, then sent it off to my parents' where my sister and her family spent Christmas.

No comments:
Post a Comment