Friday, December 6, 2013

Monster Cookies...kind of


K woke up on Monday morning and told me he wanted chocolate chip cookies. "We don't have any cookies, bud. Sorry." "No mama! I want some chocolate chip cookies." "I heard you the first time. But, we don't have any cookies." This went on for some time and he got whinier and whinier until I finally broke down. "Look, dude, I'm not joking. We don't have any cookies. If you can find some, you can have them." He took off to the kitchen. I heard him rummaging around and then I heard the refrigerator door open. The flour and chocolate chips were sitting on the floor. "Uhhh, what are you doing?" "You said we don't have any cookies, so I decided that I would just make them. Can you get my stool? I can't reach the eggs." So that's what we did on Monday morning. We made cookies.

I thought he would be super stoked if we made monster cookies with M&Ms AND chocolate chips, but he insisted on chocolate chips only. Apparently he really did just want chocolate chip cookies. I convinced him that we should put dried cranberries in too. It took some work, but he finally caved.


When it got time to add the oats, however, I realized that we were about 3/4 of a cup short. Gaaa!! I added 3/4 of a cup of flour and it turned out just fine, although I am pretty sure with the lack of M&Ms, plus the addition of flour, these aren't really monster cookies. As a quick note, we only made half of the recipe - I really don't need that many cookies sitting around here.


K got bored and once they were mixed he was over it. He kept asking for the cookies, but I told him we had to bake them first.


Soon enough, they were baked and slightly cooled, and he dove right in.

Thursday, December 5, 2013

Advent Calendar - Part 2


Last night, I got cracking on a few more ornaments - a snowflake, a candy cane and a snowman face - for the Advent calendar. Each ornament is only one main layer of felt, but I thought they would look more finished if I stitched all the way around each one. I like how they look, but I'm not going to lie, it is kind of a pain on the little edges or corners. The candy cane got particularly messy. Ah well. The beauty of this little calendar is that if I decide I don't like an ornament or two, I can just redo it after they are all done - or more likely on November 30th, 2014.

I am now up to eight ornaments, mind you, tomorrow morning is the 6th. I really have to keep moving on this. Anyway, here are close-ups of the other five ornaments. These were the first two that I made, little ornaments (ha! ornament-shaped ornaments).


The next three were a stocking, a pair of mittens, and a gingerbread man. K had no idea what a gingerbread man was. Maybe I should add them to our Christmas cookie list!

Tuesday, December 3, 2013

Advent Calendar - Part 1


I took a little bit of a break from the blog last week. With a baby who decided that 2-5AM were ideal playing hours, I was exhausted. Honestly, there were a few nights last week that I went to bed at 7, same time as the boys. Over the weekend, since Y was here to watch the boys in the morning while I caught up on some sleep, I got started on an Advent calendar for K (and for T, but not for a few years). I know I started a bit late - on Friday, November 29th!! - but I had a few other projects at the end of the month that I needed to get done before I started this, which I'll blog about later.

I'm not joking at all, when I tell you that K has been asking to put the Christmas tree up since last February. Sometime during the spring, I told him that we can't put up the Christmas tree until after Halloween. After his Halloween party, I had just gotten everything cleaned up and was making dinner when he came to the kitchen and said, "whelp, I guess it's time to get the Christmas tree out." He said it like it was some huge chore, and yet obviously he had been waiting for ages for that moment. Poor guy, but I explained a bit further - the tree isn't coming out until December. He took it well, but towards the end of last month, it was a constant barrage of, "What number day is it today? When will it be December?" I figured that if getting the tree out was to be this exciting, the actual day would be exciting as well and he needed a countdown of sorts. I looked online and found a few Advent calendars for inspiration, and also tried to recall the one from my childhood. Then I just went and did whatever I wanted anyway.

I started with the pockets. I decided that I would do only up until Christmas Eve. I imagine that Christmas morning K is going to have little interest in putting on that last decoration - seeing what Santa left him will be much more exciting. I made the pockets 6cm squares. So I cut out a big rectangle that measured 28cm (enough for the pocket plus 1 cm at the top of each row) by 36cm. Then I cut four pocket strips, each 6cm by 36cm.


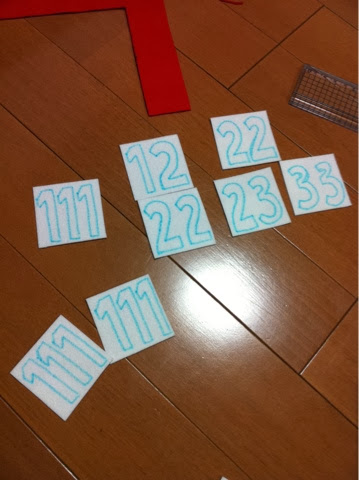
Then I got to work on the numbers. I bought iron-on felt for this bit. I drew all of the numbers starting with all then ones, then the twos, threes, etc. I wanted them to be as uniform as possible, but knew that they were going to be far from perfect. I'm cool with that for this project.


I slowly filled up the squares with their numbers.


Once they were all on, I took the backing off and iron-ed away (note: this photo is pre-ironing).


Then I sewed a tiny white and green pom-pom trim to the large rectangle.


Eeeek! It's so cute!!


Finally I sewed on the pocket strips and got to work on the tree. The tree is about 36cm wide on the bottom layer and about 40cm tall.


Then I sewed all of the bits onto a huge piece of white felt.


For the tree, I sewed on each of the green layers separately. I don't know how that middle layer got so wonky without me noticing, but it will just have to do. Trees aren't perfect anyway and I figure with the ornaments on, you probably won't be able to notice.


I set it out so that on December 1st, when K woke up he could put the first ornament on. I was sleeping, but apparently K saw it, threw his arms in the air and yelled out, "CHRISTMAS TREEEEEE!!" I love that little guy.


So far, I have only made five ornaments. I figure as long as I make a few each night, I should be able to stay ahead of the game. I figured with the ornaments being so tiny (no more than a 6cm square), they would be quite quick to whip up. I was wrong. This is going to be a labor of love for sure. Wish me luck!!

Tuesday, November 26, 2013

Business Card Holder - Take 2


This project is really quite old at this point, but things on the blog got busy from the beginning of October because of Halloween. My little brother's girlfriend started a new job a few months back and since this was to be her first job after graduation, I thought she could use a little business card holder so she could look all official and stuff. She always has such beautiful style, so I wanted to make the card holder pretty. I picked out a satin with big, delicate flowers on it, as well as a purple satin for the strap and lining. Then I went to look at my button stash. (I had just bought a new bag of mixed buttons at the fabric shop.)


There were so many pretty ones to choose from. The ones below were some of my favorites. 


I made the card holder the same way I did one ages ago, but instead of a hairband to hold it shut, I made a little strap. 


I love how it turned out. I think it is so feminine and pretty, just like my brother's girlfriend. 


I tested it on one of Y's business cards, but it was a shade too small. I totally panicked and then tried it on my other brother's wife's card and it fit perfectly. Who knew business cards come in all different sizes!?

 
Good luck with your job, B!! We love you over here and think about you a lot!


Friday, November 22, 2013

Sweet Potato Snackies


Today K went on a field trip to the zoo. (For those who are curious, this week, he went to school like a champ - very little crying and puke-free!!) For field trips, the kids have a special backpack that is a bit smaller than their regular one. As a result, while he needed to take a bento, it had to be a small bento (generally just onigiri or a sandwich) and not even in a bento box, but wrapped in foil. They were also instructed to bring a snack. Since K's onigiri contained no fruits or veggies, I thought I should make a snack that had some sort of vitamins in it. I realize these are not healthy in the least, but they do have sweet potato in and that has to count for something, right?

Start by steaming 400 grams of sweet potato. I use a tagine for this, but anything works. You could probably even do it in the microwave, but I've never tried that.


While the sweet potato is steaming, put 70 grams of sugar, 30 grams of fresh cream, 70 grams of milk, 50 grams of butter, and one egg yolk into a pan.


Once the sweet potato is soft, peel and mash it.


Add the mashed sweet potato to your pot and mix it up with the heat on medium. Keep cooking it like this until the liquid is gone and it starts to get kind of stiff.


Put it into a bowl, cover with plastic wrap and put it in the fridge for about an hour or until it is cool enough to handle.


Once it has cooled down, divide it into fairly equal portions, I got 12 out of it, but the original recipe said you could probably get 15. Put each little ball in a foil wrapper.


Form each little portion into an oblong shape. I don't know why we do this, but these treats are super popular in Japan during the fall and they are always this shape. I like to think it's because it looks kind of like a sweet potato (or a football?? Both equal fall to me.). Once they are all formed, crack open another egg and separate the yolk. Mix the yolk up a bit and use your finger to put some on the top.


Then bake them for 15 minutes at 200C. They should have a few brownish spots on them. If not, put them back in for another 2 minutes or so. Then eat! K begged for one of these after dinner last night, and of course I gave him one. He absolutely loves them. He was so super stoked to have one at the zoo today - in fact, according to him, that was his favorite part of the day today. What a cutie!

Thursday, November 21, 2013

Bento Thursday - The Mother of All Bentos


Every fall, it seems that each school in Japan holds an Undokai (Sports Festival). It is something the kids spend weeks preparing for and if you are like me, the moms spend days working on the bento for. I suppose it really is just like any other bento, except it is for the whole family to enjoy. I ended up making way too much, but just as well.

K's Undokai was meant to be held on a Saturday last month. The whole week, the forcast predicted rain the afternoon. Since this is a morning thing and the school hadn't made any announcements, I figured it should be fine. I started making bits of the bento on Thursday night. I believe I started with the carrots and broccoli, but I don't quite remember. Friday night I did a bit more, and Saturday morning all I had left to do was cut up an apple, make some onigiris, fry up some shrimp and put it all into the bento boxes.


Because T's sleep is weird and he can wake up in any sort of mood, I set my alarm for 5 on Saturday morning. When I woke up it was just barely drizzling, but we were still three hours away from game time. I figured it might stop and the weather at the Undokai would be just glorious. I got the whole bento ready and was packing up the stroller, when Y checked his mail - Undokai cancelled. Are you kidding me!?!! Not to let an entire bento go to waste, we had an indoor picnic on the living room floor.


The Undokai was rescheduled for the following Saturday. Again, starting on Thursday night, I did the veggies. On Friday, K came home from school with a note saying that instead of Saturday (as it was still meant to be raining), the Undokai would be on Sunday. I put off the rest of the prep until Saturday night. Sunday morning rolled around and I did the exact same bento as I had done the previous week - dude, I was all out of ideas.

The big box contained onigiri and proteins. K got a plain onigiri in the shape of a bear. Y got two salmon furikake pig onigiris and I got an umeboshi heart onigiri.


I made fried chicken, Japanese-style omelet, and fried shrimp.


The next layers were the fruit and veggies - apples, grapes, broccoli, carrots and cucumbers. I cut the carrots into bears, flowers and hearts and also decorated with little ham flowers and banners.


The Undokai day was really nice. It was quite chilly in the morning, but as soon as the sun came out, it was nice and warm.


K's class did a few songs and a race - they are two and three years old, it was adorable. In the end, each kid was given a medal from their teacher.
 

The little dude was stoked. Adorable.


Tuesday, November 19, 2013

Stuffed Bunny

 
Ages ago, I made a little doll for K so that he could practice being a big brother. He played with it for like two days and then it went to the stuffed animal basket rarely to be seen again. The good news is that he is an awesome big brother anyway! One of my English students asked if she got 500 points, could I make her a doll like K's. That's a lot of points, so I decided it was a fair trade. When she got to about 450 points, I asked her what she wanted the doll to look like. It was like opening Pandora's box. It turned out that she actually wanted the "same doll, but instead of a person, it should be a bunny. And I want it wearing a skirt and holding a vegetable." "Uhh, okay. What vegetable?" "It doesn't matter. Anything is fine." And so I got started.
 
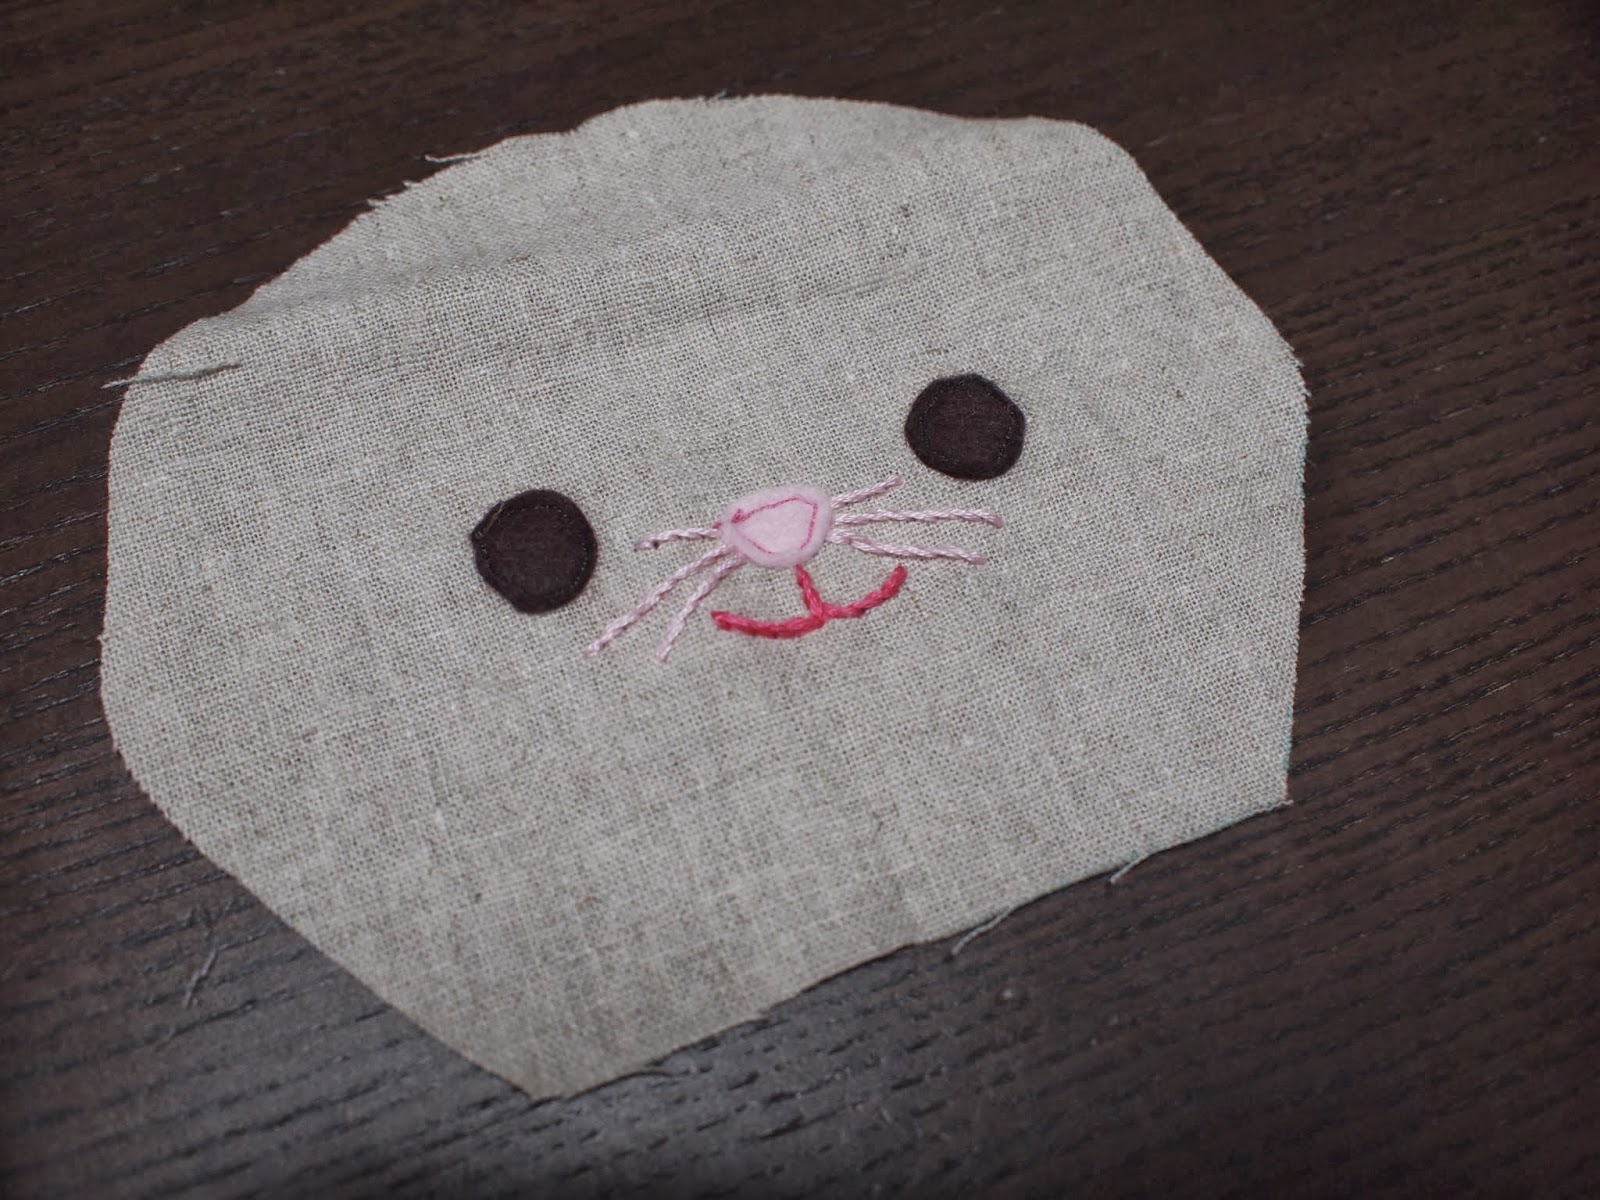
First up was the face. I used my machine to do the eyes and nose and then embroidered the whiskers and smile. 
 

Then the ears. I didn't know how big to make them; they ended up being about the same size as the arms.


Then I had to make the actual arms (and legs). I started with the arms just like K's dolls, meaning they had opposable thumbs. But really, that was a pain to do and bunnies don't need them, so I ended up making them rounded instead. Much easier.


Once all of the parts were ready, I started the assembly. First I basted the ears to the front of the face.


Then the head to the body. The shirt arms to the actual arms was next, followed by making the arms and legs and stuffing them.


Then I sewed it all up and it looked like this. Pretty cute!


But she was missing a tail. I used my little pompom maker to whip one up.


Then I sewed it to her little bum.


Next was the skirt. I started with a long rectangle. Then I zig zagged all edges, folded both of the short ends and one of the long ends in, and sewed them down.


Then I sewed the two short ends together leaving a little open space for her tail to stick out. I folded over the top edge to make a casing, threaded some elastic through and sewed it up.


I love how it looks with her little tail sticking out.


She was almost ready, but still missing her vegetable.


You know, just chillin' on the chair, waiting for me to finish up her veggie.


Naturally, I picked a carrot. The orange bit is stuffed, but I thought it would be a huge hassle to stuff the leaves, so instead I sewed some lines onto a piece of green fabric and cut around it.


I finished it up with a little ring of elastic so that it could be taken off her hand.


I just hand sewed the elastic on to the back.


And it was done! Here she is from the back.


And here she is with her lovely little friend! The little girl (and her sister, mom and grandma) was very pleased with her new bunny. Mission accomplished.