Showing posts with label Things for Me. Show all posts

Friday, January 31, 2014

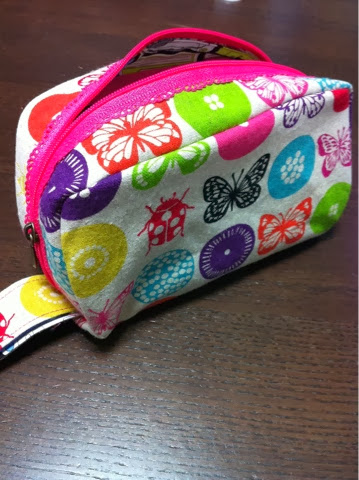
LeSportsac Rip-Off #4


Earlier in the week, I posted about a little bag that I made for a friend - it was my LeSportsac Rip-Off version 3.0. It turns out that after opening and closing my beloved original one multiple times a day, the zipper gave out. I have never seen a zipper rip apart from itself the way this one did, but needless to say I needed to make myself a new bag.


I bought the cassette fabric ages ago and had been waiting for the right project to use it. I absolutely adore it, so it was a difficult decision to make, but I finally settled on using it as the lining of this bag. At the same time that I went shopping for version 3.0's fabric (read: months ago), I bought the outer fabric for mine as well. Ugh, I love this fabric as well. I adore how the bright colors are so perfect together, yet the themes of the fabric are so very different.


I did this bag the same as all of the others, except I thought I would add a small pocket to the outside as well for the odd reciept. It turns out that I don't use it at all and it was a bit of a waste. From now on I will just stick to the inner pocket only.


I am so stoked on how this bag turned out. More than anything, I am happy to have a bag that things don't fall out of and that I don't have to adjust the zipper perfectly to either open or close the bag - it started to get a bit stressful in the grocery store lines!

Thursday, January 23, 2014

Bento Thursday - It's a bear, not a cat


It's been a while since I've done a bento post. To be honest, it's been a while since I've made a bento. There were a few here and there - all before the holidays - but they weren't all that interesting so it would have been more of a look-at-what-my-kid-had-for-lunch post. Kind of boring, in my opinion. Today, however, was a bento day. Last night I asked K what he wanted in his bento and he requested "an onigiri with sesame seeds, carrots, cucumbers, fried chicken and M&Ms." Luckily I had all of those items on hand - wahoo!! To add a little bit of interest to the bento, I cut the carrots into stars and tried to make the onigiri into a little black and white cat face. I also added in strawberries because six M&Ms for dessert just sounded sad to me.

K got home from school today and was all proud of himself since he ate his entire bento. "Great job, babe! Did you like your cat onigiri?" "Yeah, but Mama, that was a bear, not a cat." Looks like I need to brush up on my animal onigiri making skills.

Y also got a bento today. It's been probably two months since I last made one for him, whoops!! He ended up with rice with salmon furikake, fried chicken, herbed carrots and beans, and broccoli and sausage with parmesan cheese.


One of my friends in the neighborhood recently had a baby, so another friend and I went over to see her and meet her new baby girl. We decided to make our own bentos and take them over so we could all have lunch together with minimum hassle - today was bento day for their older kids as well. My bento contained fried chicken, strawberries, cucumber with furikake, herbed carrots and beans, and (becuase I ran out of white rice making the other bentos) a sekihan (mochi rice with black bean) onigiri. Yum!!

Tuesday, January 21, 2014

Pocketed Infinity Scarf


Let me preface this post with: I am the worst selfie taker in the world. For some reason it takes a lot of concentration for me to take a photo of myself. As a result, I always looks strange. Moving along...

We are going to go on a little vacation soon and while at the airport between the four of us, I will need to juggle six passports. Why, you may ask. Both K and T need two - one American and one Japanese - plus mine and Y's. Embarking on an 8 hour flight with the two little boys, my bag is going to be a mess of toys, books, snacks, clean diapers, and changes of clothes. Finding passports between all of that is going to be quite the task. One thing that I always take on any flight is a scarf - easy to take off when it's toasty, simple to put on when I get a bit chilly. Given that a scarf is a must, I figured I could just devise a way to have the scarf securely hold our passports. The pocketed scarf was born.


I started out with 60cm each of two different colors of jersey. The jersey I picked was the tube kind, so after cutting two 30cm lengths out of each color, I cut a slit down one of the folded ends of each of the four pieces.


Next I sewed the grey rectangles together to create one 30cm by really long rectangle, and the same for the pink.


Then I looked through my scraps to find a fabric that I liked and that was big enough for the welt pocket. Keep in mind that you will need two rectangles of the same size to create the one pocket. Once I found one, I cut the fabric in half and put one half on top of the gray fabric where I wanted the pocket to be and marked with pins about 2cm in from the edge of the pocket fabric.


Then I pinned the gray and pink rectangles together. My fabric didn't have a right side, but if yours does, you will want to be sure to pin them right sides together.


Then I sewed the gray and pink rectangles together leaving an opening where the pocket will go. I stopped sewing at the blue pin and started again at the white pin (see the photo above).


Following this tutorial, I worked on the welt pocket. I will roughly show what I did, but trust me, take a look at that tutorial because it is much better explained that I could ever do. I placed the pocket fabric on the scarf fabric, both right side up. That was a mistake, however, the pocket fabric should be right side down. Then mark on the pocket fabric where the zipper will go. Draw a rectangle about 1cm tall by the length of your zipper, being sure to center the height of the rectangle on the slit between the gray and pink fabric. Also draw a line down the middle (where the slit is). Stop about 1cm from the short edges of the rectangle and draw two diagonal lines to the corners to create a triangle on the edge.


Super carefully, sew along your rectangle. Since our main fabric isn't one single piece, I was super careful to not sew the seam allowance into the pocket. To do this, I started by flipping the allowance down (the gray allowance was folded to the pink side) and sewing the 1/2cm on the edge of the rectangle, across the top and down the other 1/2cm edge.


Then I flipped the allowances (this time the pink allowance folded to the gray side) and sewed the bottom half of the rectangle - starting with the 1/2cm edge, across the bottom and up the final 1/2cm edge.


Then cut the pocket material down the middle and on the little diagonal lines as well.


Flip the pocket through the slit and iron it all down.


Line up your zipper - mine was super long. No big deal, just cut it to the length you need. Pin it on and super carefully sew it on.


Flip over to the right side of the fabic and admire your work! The hard part is done.


Next put the other piece of pocket fabric face down on top of the piece that is sewn to the scarf and sew all around the outside of the pocket. Then take a look! Your zippered welt pocket is done!


At this point, you might want to anchor the pocket to the scarf. I doubt this is necessary, but I think it would just help to keep the pocket in place once you put something in it.


Sew the long edge of the scarf together - in my case, the pink to the gray.


Once the two long ends of the scarf are sewn together, reach through the tube and pull one end of the scarf up so that the open ends meet. The right sides should be together.


Sew around the circle, in my case, pink to pink, gray to gray, leaving a little opening to pull it all right side out.


Pull it right-side out and all you have left to do is to sew up the little turning hole.


Wrap it around your neck and start throwing things in that pocket! (Putting my keys into the pocket, while taking a selfie clearly takes a lot of concentration.) So far I have used this pocket to hold my keys, my phone, pacifiers, toys for T, and some cash. It turns out that having a pocket there is quite handy!
Thursday, November 21, 2013

Bento Thursday - The Mother of All Bentos


Every fall, it seems that each school in Japan holds an Undokai (Sports Festival). It is something the kids spend weeks preparing for and if you are like me, the moms spend days working on the bento for. I suppose it really is just like any other bento, except it is for the whole family to enjoy. I ended up making way too much, but just as well.

K's Undokai was meant to be held on a Saturday last month. The whole week, the forcast predicted rain the afternoon. Since this is a morning thing and the school hadn't made any announcements, I figured it should be fine. I started making bits of the bento on Thursday night. I believe I started with the carrots and broccoli, but I don't quite remember. Friday night I did a bit more, and Saturday morning all I had left to do was cut up an apple, make some onigiris, fry up some shrimp and put it all into the bento boxes.


Because T's sleep is weird and he can wake up in any sort of mood, I set my alarm for 5 on Saturday morning. When I woke up it was just barely drizzling, but we were still three hours away from game time. I figured it might stop and the weather at the Undokai would be just glorious. I got the whole bento ready and was packing up the stroller, when Y checked his mail - Undokai cancelled. Are you kidding me!?!! Not to let an entire bento go to waste, we had an indoor picnic on the living room floor.


The Undokai was rescheduled for the following Saturday. Again, starting on Thursday night, I did the veggies. On Friday, K came home from school with a note saying that instead of Saturday (as it was still meant to be raining), the Undokai would be on Sunday. I put off the rest of the prep until Saturday night. Sunday morning rolled around and I did the exact same bento as I had done the previous week - dude, I was all out of ideas.

The big box contained onigiri and proteins. K got a plain onigiri in the shape of a bear. Y got two salmon furikake pig onigiris and I got an umeboshi heart onigiri.


I made fried chicken, Japanese-style omelet, and fried shrimp.


The next layers were the fruit and veggies - apples, grapes, broccoli, carrots and cucumbers. I cut the carrots into bears, flowers and hearts and also decorated with little ham flowers and banners.


The Undokai day was really nice. It was quite chilly in the morning, but as soon as the sun came out, it was nice and warm.


K's class did a few songs and a race - they are two and three years old, it was adorable. In the end, each kid was given a medal from their teacher.
 

The little dude was stoked. Adorable.


Monday, July 1, 2013

One-Trick Pony


I fear this pregnancy and my lack of clothing is turning me into a bit of a one-trick pony. Here is (yet another) maternity t-shirt. I actually made this one (and took the photos) a while ago, but kept forgetting to have Y take a photo or two of me in it. I wore it maybe three times and this last time, while washing it, a dark brown pair of pants bled onto the white fabric and it is now unwearable. I am a tad bummed. Does anyone have any tips to get the tan out? I soaked it for days in Dawn dish soap, but I am a bit at a loss. I would just bleach it, but the back is patterned and then that will be ruined. Gaaaa...

Anyway, since I wanted the front to be white and I had some spare white jersey laying about, I just used that. It was a bit thin, so I cut two layers for the front and sleeves and basted them together.


When basting I used a stretch stitch so that the seams wouldn't rip. This meant, however, that I skipped over the segment to be ruched. Then I went back and ruched it up. It was a bit of a process, but it worked!


As per usual, the shirt was a breeze to whip up. The one minor issue that I keep forgetting to write about when posting about this shirt is the fact that I find the sleeves too long before sewing. It is very possible that I cut out a different size sleeve, but to be honest it doesn't bother me much and I am a bit too lazy to open up the pattern again and check. As a result, I gathered the very top of the sleeve to give it a tiny bit of a puffed look at the top. I figured the puffiness added to the femininity of the shirt, which would look cute with the flowered back.

 
Seriously, I really want to wear this again...any suggestions regarding the staining issue? Also, I only have about 5 weeks before we get to meet this little one. I am so super excited!!!

Tuesday, June 25, 2013

Maternity T-Shirt - Take 2


A while back, I posted about a maternity T-shirt that I made since I was getting a bit bored of my current clothes. The excitement with that shirt has run it's course and I was ready for a new one. I am just over 33 weeks now and everything is looking good (medically, anyway). I haven't been gaining much weight recently, but my stomach is getting huge! The doctor was quite surprised when I went in for my appointment this week given that I technically lost weight, but my stomach grew by 5 centimeters. Eeeks! The baby doesn't seem all that huge either, so he was at a bit of a loss trying to come up with a reason for my massive growth.

Anyway, I started with some grey jersey fabric that I realized didn't have much stretch to it. So when I was cutting the pattern, I added about a centimeter or two to the outside of the shirt so it would actually fit me when I put it on. I also added a bit of length since I realized I didn't love where the original shirt hit me in back.


Same as the last shirt, this was really fast to cut out and put together. I think that it took less than 2 hours in total. The first step was to ruche the waistline of the front. Once that was ready, just sew it to the back using a ton of pins to keep the ruching where you want it. Then just sew up the shoulders and add the sleeves.


Once the shirt was made, I decided to switch things up a bit and added bias tape to the neckline instead of just folding it under and sewing. A grey T-shirt just by itself seemed it needed a bit of sprucing up to me. I folded the sleeves and bottom hems under and sewed as usual.


Since I was already on the sprucing up kick, I cut out a little pocket and hand-sewed it on for a little extra fun. I made it a real pocket, but now that I think about it, I don't know why I did that. It looks the same as if I had just made it a faux pocket and I am certainly not going to stick anything in there. At least it is fun for K to poke at and pop pebbles into.


Just a few weeks left and we will get to meet the little one - I am so excited!!

Friday, May 24, 2013

7 Months In and I Need New Clothes


I am 28 weeks pregnant today and I am already bored of my maternity clothes. Since K was born in April, I didn't have many summer items going into this pregnancy. My lovely mom and my best friend from home each sent me a few items which have been wonderful, but I am on like month two of wearing the same four items. It was time for some new clothes.

A while back I bought a Megan Nielson pattern so I could make this dress. I figured I might as well throw in a pattern for a t-shirt as well - one can never have too many t-shirts. I had extra brown fabric from the dress I made a while back, but I didn't want the shirt to just be a brown t-shirt - kind of boring, I thought. I decided I wanted the back to be lace, but also did not like the idea of having it bare under the lace. As my solution, I started by cutting out a piece of brown jersey, as well as stretch lace for the back and sewing them together.


I was expecting the lace to strech a lot more than it did. It really wasn't too difficult to deal with at all.


After cutting out the front, I ruched it up the sides and then pinned it to the back like crazy. Once that was sewed up, I tried it on to make sure it actually fit. It did and I was so super stoked! The final step was to add the sleeves and then deal with the raw edges.


This shirt was super fast to work up. I love projects like that! In fact, these photos are taken from last Friday when I had to go on a field trip with K. I had nothing to wear and decided two nights before the trip that it was time to make the shirt. The first night I prepped the pattern and cut out the fabric. The second night was sewing it all together. I don't think it took more than an hour and a half to sew. I love the fit and can't wait to make another one!


As a note, I am not much one for selfies, but I almost never wear my hair down and am almost always wearing my glasses. Because of the field trip, I did it up a bit so I decided to just take the photos when we got home and use these in this post. Y offered to take new photos the next day, but I was already showered, hair up, contacts out, i.e. not as cute.