Monday, January 21, 2013
Cravings
One of my best friends here is a Canadian woman, B. Next month she will be giving birth to a (sure-to-be) beautiful baby boy. A baby shower was definitely in order. This week will focus on the foods and one of the activities from the party.
Today, we will start with (drum roll please) craving-themed foods! B is writing a pregnancy blog aimed towards family and close friends that are inevitably far, far away. One of her posts a while back mentioned some of the foods she'd been craving, "tomatoes, iced tea with lemon, peanut butter and banana sandwiches, milk (which in general I don't really like), Rocky Road ice cream, hot dogs with relish, applesauce, oatmeal, and fried chicken dipped in maple syrup (but that only happened twice)."
For drinks, we had lemon iced tea and milk. For savory foods, I went with mini-peanut butter banana sandwiches,
fried chicken with maple syrup (it's just too funny not to include),
and a tomato, eggplant, chickpea based phyllo dough pastry.
Knowing that she loves Mediterranean foods and cheese in general, I also made what my little brother termed "Greek egg rolls". Basically three Greek cheeses, sun-dried tomatoes, and herbs baked in phyllo dough wraps.
She'd also mentioned in a different post that she'd been craving mint-chocolate chip ice-cream (so much so that she sent her husband out in a typhoon to get some for her). As it's freezing, I really didn't want to do ice-cream. Instead I went with peppermint patties.
You start by making the peppermint filling. It ends up being similar to a dough. I'd read the comments and decided to add more peppermint than suggested. To counter the extra peppermint oil, I decreased the water, but it was really dry and crumbly.
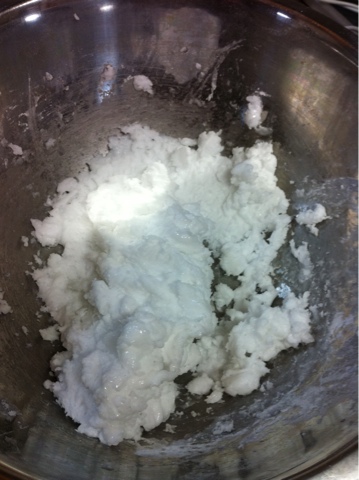
I ended up adding a tiny bit more water to make it hold together.
Once that is ready, you roll it out and freeze it
and then cut it into rounds.
Freeze them again and melt your chocolate.
Then dip your rounds in the chocolate, make a little design with a fork and call it a day.
A few tips that I learned while making these:
- You don't have to keep the chocolate at such a specific temperature, as suggested. I was lazy and didn't measure mine at all. I just melted it as usual and then carried on.
- That being said, if you try to dip while the chocolate is too warm, it will melt the mint filling. It's not a big deal, just the shape distorts a bit. If this happened, I just waited a minute or two and gave it another go.
- As usual, I used my broken, plastic fork for the dipping. It has yet to fail me. If you need to dip something in chocolate - break a fork!
- My patties were on the small side, cuter in my opinion, so I broke one prong off of a new plastic fork and used just three prongs to make the design on top.
- For the design, you'll want to dip a few, then put them down to let them cool for a few seconds before you do the design on top. If the chocolate is too warm, the design doesn't stick.
- Finally I learned that these are DELICIOUS! I haven't had a store-bought one in years, but these are definitely just as good, if not better, if my memory serves.
Wednesday, January 16, 2013
Ear Warmer
I haven't posted in ages! I mentioned a few posts back that my little brother was going to come for a visit. Well, he's here. And my priorities have shifted. It's been such fun having him around. K is loving it as well. This past weekend, we went on a trip and got back yesterday evening. I was exhausted and there was no way I was going to blog. One more night can't hurt, right?!?
A few weeks ago, I decided it was time to cover my ears up while going outside. I used my hat from previous years, but it only really fits well if my hair is down. Recently K has been extremely opposed to me having my hair down. I'm usually not one to let a man (or boy, for that matter) dictate my looks, but let's be honest putting my hair up is easier than having it down. Also, I really don't need a huge freak out to start my day.
I had found this tutorial ages ago and decided to give one a try. I made the pattern according to the lengths listed and found that it was super wide. Maybe I have a tiny head?!?
I ended up cutting the pattern down - nearly into half.
Then I cut up my fleece and realized that it was going to be way too long given the amount of stretch. I did a few more cuts and then decided I was just going to go for it.
I sewed it as per the tutorial and it worked just fine. The shape was a bit off however. I'm blaming this on the stretch. So I folded and resewed the outside bit near my ear.
If you look closely, it's a bit of a mess. From far away, however, no one would be the wiser.
After that, I got started on my giant bow. I love this bow! It's so sweet on the ear warmer. I sewed it on by hand instead of using any hot glue (as suggested). My reasoning is that if I were to redo the base of the ear warmer, I could just cut off the bow instead of making a new one.
I have yet to make a new base. One day. Maybe.
The last step was to add a button and button hole.
I love how the ear warmer doesn't make my hair flat and greasy-looking. I used this nearly every day for a few weeks straight. Then it got really cold, so I had to sack up and just get a new hat.
Friday, January 11, 2013
Three DS Cases
On Monday I posted about a DS Case prototype that I made for myself as preparation for Christmas presents for my three English students. As the presents were all the same, I wanted to personalize them somehow (particularly since two of the girls are sisters). Each of them like different cartoon characters, which are all quite popular, so I decided to use character fabric for the outside and the same fabric for all of them as the lining.
The youngest likes Cinnamaroll, her sister likes Rilakuma, and her friend likes Pokemon. Finding these fabrics was simple enough, but finding one for the lining that looked cute with all of these was a bit of a challenge. I settled on polka dots because I love polka dots!
With these fabrics I got to cutting. This is where my deviations from the original tutorial started. I didn't particularly care for the bigger pocket above the game pockets. I didn't really find it necessary and I did not like that I wasn't able to just fold the DD up tightly when closing the case. I ended up making the final cases 16 inches length, as opposed to 19.
That means that in preparing the pockets, I had one less per case to do - wahoo!! I started with the youngest girl's case. I figured I would do hers to ensure my changes worked and then do the last two assembly line style.
As per the tutorial, I started with the pockets. In the original, I found the pockets to be really snug, so I ended up sewing the pocket lines 1.7cm apart from one another. This gave me very little on the sides for my seam, but I figured it would be fine.
As per the case I made for myself, I quilted the lining for the girls' cases - I liked the extra padding it gave to the case. Then I attached the pockets to the lining. I did the main DS pocket in the outside fabric simply because I thought a bit of contrast would be cute. The tutorial says to make this pocket slightly wider than the case itself so you have more wiggle room for the DS, but I forgot to do this on the original and it was snug, but fine. This also meant that I didn't need the hair tie to keep the DS in the case.
Once the lining and pockets were ready, I sewed them to the main fabric with the littlest seam possible. This was a bit of work, but I wanted to make sure the games would all fit.
Then I flipped and top-stitched around, but I didn't go all the way to the bottom of the DS pocket, I went just above it so as to not take any space away from an already tight pocket. I also sewed two more lines to guide the folding.
Since the hair tie at the top of the bag was thick to sew over and my machine is not great, I was left with a bit of a mess.
Luckily I'd bought super cute bow buttons originally intended for the DS pocket, but since I didn't need it in the end, I sewed the other button to the top to cover the mess and used the bow button to close the case.
Finally I sewed a button on to close the bag. Eeeek!! So cute! Then I had to do the other two.
Finally they were all done, we had a Christmas party, and the girls opened their gifts. They were all so stoked. Two of them have a 3DS and the other has a DS similar to mine. I told the girls that I think the case should work for all of their DSes, but if not I'll make them new ones. In unison, they screamed, "Nooooo!!!" The older sister said she'd find a different use for the case if it didn't fit. What sweethearts.
Thursday, January 10, 2013
Spinach and Cream Cheese Bread
While we were in Yokohama for the New Year holiday, we stopped for lunch one day at a bakery/cafe. In Japan we have heaps of bakeries and most are delicious. This particular chain is Y's favorite. I ordered a Spinach and Cream Cheese roll and it was AMAZING! So delicious, in fact, that a few days later I begged Y to find one of those shops near his parents' house so that I could get the same bread. I got two - one for that day and one for the next!
Now that we are back, I find that I am still wanting that bread. Alas, the nearest bakery to us is a different chain and they don't have the same bread. So, I figured I'd have a go at recreating it.
The bread seemed simple enough - a fluffy dough with heaps of spinach in it. As you eat it and get towards the middle there is a cream cheese treat waiting for you. There was also some random corn thrown in, we like to do that here, but I decided it was unnecessary.
I started out with a "Butter Roll" dough. The dough consists of flour, egg, sugar, salt, milk, butter, and yeast. I used my trusty bread maker and set it to beep when it was time to add in the spinach.
While the bread maker was doing it's thing, I prepared the spinach. I used a bag of defrosted frozen spinach and squeezed out as much of the liquid as possible. Once the bread maker beeped I put the spinach in. It seemed like an awful lot, so I left about 1/6 of it out.
Once the bread maker was done, I opened it up and saw that the dough was really liquid-y. It's not usually like that, so I got a bit worried. I put down a lot of flour and lightly kneaded it into the dough.
Once I thought it was good enough, I divided it into six equal-ish pieces and let them rest for 15 minutes.
During that time, I got out a block of cream cheese and cut it into six blocks. Once the 15 minutes were up, I gently flattened one of the pieces of dough, put a block of cheese in the middle and pulled the sides up towards the middle and pinched.
Then I put each one on a baking sheet, pinched side up.
Once they were all prepared, I put them in a warm place and let them rise for 40 minutes. They were huge by the end of this time.
Finally I put an egg wash on the tops and baked them for 20 minutes at 200C. I wasn't paying attention, but I think I should have baked them for a bit less time - maybe 15, 18 minutes? - they got a little browned for my taste.
To be honest, I haven't really been feeling too well so I haven't even tried the bread. But, Y took one to work today and said that this is his favorite bread to date. Good news! My younger brother, who is visiting, also had one this morning and gave his stamp of approval as well. Maybe I'll feel good enough to have one for breakfast tomorrow. Fingers crossed.
Monday, January 7, 2013
Nintendo DS Case
As I've mentioned before, I teach English to three little girls. Last year, I only taught the two older girls and for Christmas I made them little matching purses. The younger girl (a little sister to one of the older ones) is just 6 years old and the older girls are 9. I wanted to make each of them the same thing for Christmas, but not a purse. I racked my brain - what do both 6 and 9 year olds need?!?) and then I came up with a DS case. I, also, have a DS so it would be easy to mock one up and make sure it works before doing the girls'.
I looked online and quite liked this tutorial.* I made a few changes from the start. I figured the girls' might beat up their DSes a bit, so I wanted the case to have more padding. After cutting out my pattern, I also cut out some batting and quilted it to the lining fabric.
Then the game dividers had been sewn; I tested it out and it worked! Wahoo!!
Next you baste all of the pockets to the lining. Then it was a pretty simple, right-sides facing, insert a hair tie and sew together deal.
Because I adore top-stitching, I went around the whole outside one last time.
The final step is to sew on a few buttons and then you would be done. I haven't actually done that step yet, because I was busy with other things (or just lazy about finishing it - either way).
Aside from the batting and top-stitching, I followed the tutorial closely and while I liked the case, I didn't love it - hence the lack of buttons. I knew some changes had to be worked out before I made the cases for the girls.* But, I'll post about that later in the week!
*As I was linking back to the tutorial, I noticed that it has been updated since I used it to make mine (just before Christmas). I haven't looked very closely yet, but I see that one of the changes I made was also made in her new version. But again, more on all of that later.
Subscribe to:
Posts (Atom)


