Thursday, February 6, 2014

Ichigo Daifuku Macarons


Many of you know this already, but Y is getting transferred to the States for a few years, so of course K, T and I are all going along for the ride. It is all kind of sudden, as in we found out last week and we will leave next month. Since we are leaving, I am trying to both not buy things we don't need and also use everything that we have. Good strategy, right?

That being said, however, I was really craving ichigo daifuku - strawberry and sweet bean filled mochi. Yum. It is one of my favorite things. My rice maker can make mochi, perfect! But I didn't have any mochi rice. It is only sold in 5kg bags and there is no way I am going to go through 5kg of mochi rice in such a short time. What I do have a lot of in this house, however, is almond flour. Instead of mochi, I decided I would make ichigo daifuku macarons.

I use Cecile Canone's recipe and I swear by it. If you want to make macarons, I highly recommend her book! You start by combining powdered sugar and almond flour. In a separate bowl, whip up a meringue.


Using a spatula, combine the two until the mixture is smooth and delicious looking.


Pipe them out and let them rest for a while. Finally bake them up.


Once they are baked you can add pretty much any filling and they are nearly guaranteed to be delicious. For mine, I obviously wanted sweet bean and strawberries. I started by rolling little balls of sweet bean.


Then I flattened each ball into a disk and put one on both the top and bottom macaron. Then I cut up a strawberry, put it in the middle and made a little sandwich. I made them "to order" as I was afraid the strawberry would get weird if I left it cut for too long.


I'm not going to lie, I LOVE macarons. I have made them numerous times at this point, but these are easily my favorite. They satisfied my craving, but then I just wanted to eat more of them. Between Y, K and I, these were gone pretty quickly. K devoured them, kid doesn't mess around with macarons - according to him, they are his favorite cookie. I'm raising a smart kid, yo!

Tuesday, February 4, 2014

Mushroom House Pin Cushion


A few months ago, my little niece started sewing. My sister, her mom, doesn't sew at all so for Christmas I put together a little sewing kit for my niece. I had such fun going through the sewing shop and picking up little things - pins, fabric markers, scissors, a tape measure, trims, and a few fabrics. On top of the store-bought items, I thought it would be cute to make her a little pin cushion. She is quite into fairies, so when I came across this tutorial, I knew it would be perfect for her.

The tutorial includes a pattern, but I wanted my completed pin cushion to be quite small, so I scaled the pattern down a bit. Once I got all of the pieces cut out, I sewed the top of the mushroom together with my sewing maching, then I sewed on the little spots by hand.


Next up was the base. I was so excited to make this part. It was all done by hand, so while it took a little bit longer than I had anticipated, I love how it turned out in the end. Here it is with just a door and windows.


But add some flowers and vines and it is so super cute!


I am pretty new to embroidery, so I kept looking up how to do stitches and how to make French knots. I think I could make them in my sleep after doing all of those.


Once the base was ready, I sewed it to the mushroom cap and put some stuffing in. Once it was about half full, I added rice to the bottom to weigh it down a bit. Finally I sewed on the bottom and it was ready to go.

 
I love how tiny and sweet it is. I have no idea if fairies live in mushrooms, but I would like to imagine a sweet, little, pink fairy floating in and out of that door. 
 

I got the sweetest thank you card from my niece a week or so ago. She apparently appreciated the "design and creativity" - what a cutie!!


Friday, January 31, 2014

LeSportsac Rip-Off #4


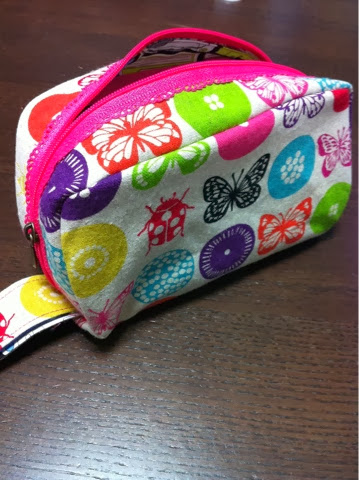
Earlier in the week, I posted about a little bag that I made for a friend - it was my LeSportsac Rip-Off version 3.0. It turns out that after opening and closing my beloved original one multiple times a day, the zipper gave out. I have never seen a zipper rip apart from itself the way this one did, but needless to say I needed to make myself a new bag.


I bought the cassette fabric ages ago and had been waiting for the right project to use it. I absolutely adore it, so it was a difficult decision to make, but I finally settled on using it as the lining of this bag. At the same time that I went shopping for version 3.0's fabric (read: months ago), I bought the outer fabric for mine as well. Ugh, I love this fabric as well. I adore how the bright colors are so perfect together, yet the themes of the fabric are so very different.


I did this bag the same as all of the others, except I thought I would add a small pocket to the outside as well for the odd reciept. It turns out that I don't use it at all and it was a bit of a waste. From now on I will just stick to the inner pocket only.


I am so stoked on how this bag turned out. More than anything, I am happy to have a bag that things don't fall out of and that I don't have to adjust the zipper perfectly to either open or close the bag - it started to get a bit stressful in the grocery store lines!

Thursday, January 30, 2014

Bento Thursday - Just a Triangle


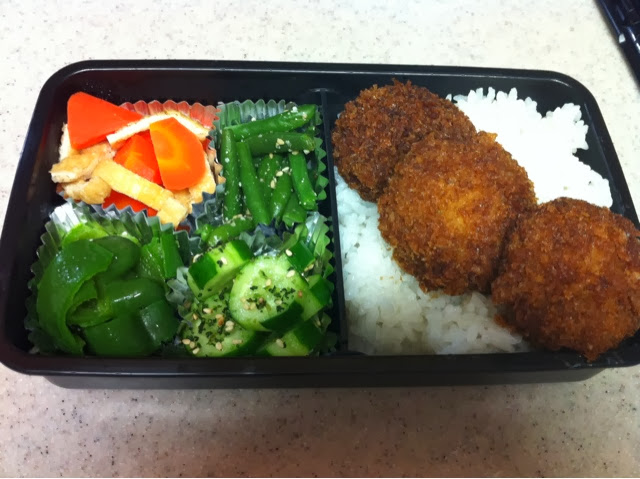
It was bento day again today - wahoo!! K requested the same lunch as last week, but instead of carrots he wanted green peppers. I asked him if he wanted me to make him an animal for his onigiri. Apparently remembering the bear/cat disaster of last week, he looked at me and said, "uhhh, no mama. I'll just have a triangle." Has he lost confidence in my onigiri-making skills!!?? Oh no!!! At first I was a little sad, but then I realized that really, a triangle is way easier and takes about 30 seconds to make - good news because that's about 1 extra minute I get to spend in bed before waking up to deal with lunches.

Y's lunch consisted of carrots with tofu, green peppers with sesame seeds, cucumbers with furikake, green peppers cooked in dashi (fish stock), ground beef, potato and cabbage croquette, and white rice. Yum yum!!

Wednesday, January 29, 2014

LeSporstsac Rip-Off #3


This is a post that has been sitting in my draft box for literally months. In fact, you may notice that my nails are the same as in my Halloween posts!! I am still in love with this little pouch, which is why I keep making it for friends (as well as a second one for me that I'll post about in a few days). During the summer, I made a shopping bag for a good friend of mine. This little pouch was to go to the same friend. While I didn't want the fabric to be the exact same, I did want them to match or at least look cool together. I found a fabric by the same designer that was in the same colors as the bag fabric, but instead of flowers it had little birds on it - perfect! Once I decided the outside fabric I took ages wandering around the shop looking for a lining. I ended up with a blue patterned fabric that I really liked. First things first, I cut out all of my pieces. (If anyone is interested in making their own pouch, leave a comment and I can post the measurements that I use for mine.)


The next step is to sew on the pockets, prepare the zipper and sew the inside and outside pieces together.


Next sew the zipper to the bag. I am always careful to mark the middle of the long end of the zipper piece and the middle of the bag and then pin starting from the middle and working my way out.


Sew one side of the zipper on and then open the zipper before sewing the other side on, otherwise you won't be able to open the bag and you'll probably cry.


Next baste the wrist strap between the main bag fabric and the short end of the zipper piece.


Next sew on your side pieces.


Then cut around the bottom edge so it is flush with the bag.


Flip the bag right-side out so you can make sure the stiches are all on the inside and the corners look nice.


The final step - my most hated step - is to sew on the bias tape. I love how it looks, but bias tape tends to stress me out. Just like that, your bag is ready for your keys, phone, wallet and a few band-aids (in case you have a rambunctious little boy to be chasing after). I hope you get as much use out of your pouch as I have out of mine, B!!


Tuesday, January 28, 2014

Healthy (?) Brownies


I wrote last week about how we had 17 people at our house two weekends ago, 9 of whom were kids. In addition to the two cheesecakes I made, I thought a batch of brownies might go over well with the kids. Around the same time I was planning my desserts, a friend of mine of Facebook asked a general question if anyone had ever made brownies with spinach in them. What? I looked online and found that Jessica Seinfeld had a recipe from her "Deceptively Delicious" book for brownies with spinach and carrots in them. The recipe was online, so I figured I would give it a try.

I made my spinach puree. At this point, I thought about just stopping the madness and finding a new recipe. T is close to starting solids, I could just freeze the puree for when he needs it in a few weeks.


The carrots were already steaming, however, so I figured I might as well keep going. But yikes, this did not seem like a good idea to me. I followed the recipe closely, only substituting butter in for the margarine.


As I mixed it all up, it did start to resemble brownie batter, but I just couldn't get the bright green and orange out of my head.


I baked them up regardless, and let them cool down completely before trying one (as per the recipe). In the end, I just wasn't all that impressed as they didn't seem brownie-like to me. I had Y try one, he said it was fine. K seemed to like them just fine as well, but I am left unconvinced. At the party, only one or two were taken - the cheesecake was obviously better.

 
It's not that they tasted bad. For the most part you couldn't taste the spinach, although I did feel something tasted strange in there. The consistency was also a tad off for me. But most importantly, given that there is 1 cup of purees and then the pan is cut into 12 (I did mine into 16) pieces, I wouldn't really consider these a way to get in the veggies. With 16 squares cut, that equals out to a whopping 1 tablespoon of vegetable puree per brownie. That's not really worth the lack of deliciousness to me.
 
That being said, I am lucky in that K is a little veggie monster. His favorite food is asparagus, closely followed by brocolli. He doesn't care much for pork or beef, but he loves every other protein imaginable. I guess if my kid wouldn't touch a veggie, I might make these again, but for the meantime, I think I will stick to my full fat, full sugar, nothing-healthy-at-all brownies ;)

Friday, January 24, 2014

Chocolate Oreo Cheesecake


As I posted about earlier in the week, we had a house full of people last weekend. So many, in fact, that I ended up making two cheesecakes, plus a batch of brownies (stay tuned). One of the cheesecakes was plain with fruit topping and the other, this one, was chocolate with Oreos mixed in. I have made numerous chocolate cheesecakes before, always following the same recipe. I follow it pretty closely, the only major change is to just crush up some Oreos for the base, with nothing else added to it. For the cheesecake bit, I follow the recipe exactly.


Once the batter was mixed up, I crushed up about 10 Oreos and mixed them in as well.


Then I baked it in a water bath and it turned out delicious. At the end of the party, the cheesecake with fruits was completely gone. This one was left with five pieces. Knowing that few of the kids got their own piece of cake, it seems that a number of the adults had two pieces each - good thing I made them both!! This cheesecake was gone pretty quickly from our house as well. We are headed off on a vacation soon and the last thing I need is cut up cheesecake sitting in my fridge. Y requested one piece since he only had one piece of the other cheesecake. The other four were plated and taken straight to a neighbor's house. Done and done!