Friday, March 28, 2014

Power Cord Case


Way, way back in my pre-mommy days, I worked in a Japanese office organizing training for managers in our subsidiaries abroad. This job meant a lot of travel, both within Japan and abroad. I would either jump on the Shinkansen or an airplane probably a few times a month for day trips to Tokyo or sometimes for training sessions lasting up to two weeks. This meant that I had to be organized about making sure I remembered all of my power cords - camera, cell phone, computer, video camera, etc. Every once in a while, I would forget a cord or I would lose it in my luggage creating a gigantic panic. Nothing awful ever happened, but it was always a source of stress.

Ages ago, my "adopted" little brother got an amazing job at Pepsi Co. and I imagined that travelling would be part of his job. If not part of his job, then most definitely part of his private life. I wanted to make a gift for him and decided on a case for his power cords, essentially giving him the gift of less stress. I looked online and found a case that I quite liked and decided to follow that tutorial, with a few minor adjustments of course.

I started with the fabrics wrong sides together in the general shape of the case, just so I could have a better idea of what it would look like. Then I ironed the bottom pocket crease.


Then I took the fabrics apart, matched them right sides together, and sewed the top of the pocket together.
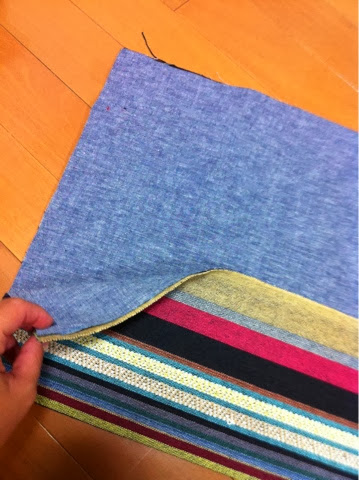

Then I flipped that right side out, ironed it and top stitched.


Then I double folded the edges so that the outside fabric would be the outline of the case when it was fully opened. Before doing that, however, I cut away at the pocket so there was a bit less bulk.


Once that was all folded, ironed and pinned, I top stitched the sides and top.


Look at that pretty mitered corner!


I didn't know what cords my little brother would be using this for, so I couldn't attach a button like in the tutorial. Instead I sewed a twill string to the inside of the bag on one of the edges.


Then using my cords as a general guide, I sewed lines up from the bottom to the top of the pocket to create a bunch of mini-pockets for each cord. I varied the width of each pocket, one is even small enough for a set of headphones - cute!!


All my little brother has to do is fill it with cords, flip the top cover down,


roll it up and tie the string around. Done! Stress-free travel at its finest. Just kidding. I don't think stress-free travel is possible, but I hope this will help a bit. Enjoy your travels, Hermes!!!
 

Tuesday, March 25, 2014

Chocolate and Vanilla Cupcakes


For Christmas my mom sent me a little cupcake making contraption that make the core of cupcakes a different color from the outside of the cupcakes, essentially creating vertical layers in a cupcake. A few weeks ago two of my good friends came over and I wanted to make us a treat. I figured I would try out the little contraption.

K and I got to work preparing the batter. I wanted to use my standard chocolate and vanilla cake recipes, so it took a bit of preparation.


Once all of the ingredients were ready, we got to mixing.


Then using the little cupcake core contraption, we put the batters into the tins. For whatever reason, it seemed easier to put the vanilla in the middle and the chocolate outside, so that is what we did. While they were baking, we made my standard Oreo cream cheese frosting.


Once the cupcakes were cooled, we frosted them and were ready to take a bite and see the perfect vertical layers of batter.


Unfortunately, the vertical layers didn't work and for the most part, we ended up with horizontal layers. They were still delicious, but not as aesthetically pleasing as I was hoping for. I'm not sure if the cupcake contraption didn't work because the batter wasn't the same (vanilla with half of it dyed) or if it simply doesn't work as well as intended. Once we move, I will have to give it another go!

Tuesday, March 18, 2014

File Holders

K's first day of school

Today was K's very last day of kindergarten in Japan (most likely, at least). It was such a bittersweet morning for us as we woke up early, got every one dressed and hopped on the train to his kindergarten. There we watched the kids sing songs and play instruments, and listened to many speeches. Then we separated into classes and K's teacher had a little ceremony for the class. It was so sweet. She called his friends up by their new classes, but Kan joined the kids who won't be attending the school next year. It was quite sad. Throughout the year, we had our troubles about leaving me to go to kindergarten, but every time he came home with the biggest smile on his face and told me how much he loved school and his teacher. He made so many friends and learned so much Japanese this year. I loved watching him march with his class and sing along to all of the songs. He's gotten so big. I'm so proud of my little guy.

Today, K's last day of school

Anyway, I feel that K's teachers really have gone above and beyond what I expected them to do. He fell in love with all four of them and I did too. They are all so wonderful. While it isn't customary in Japan, K wanted to give them a present; so I thought about what might be nice. In Japan, we have these clear plastic files that every one uses to hold papers. I don't know why exactly, but they are so super convenient and I use them constantly. I imagine that teachers use them even more than me, so I thought making a cute little file holder for each of them would be kind of fun.


I started with the tab that goes at the top. I used the same fabric that I planned on using for the lining. You can't tell, but I put some batting into the tab (and the holder as well), so they were nice and squishy.


Once those were ready, I made the buttons with the same fabric that I planned on using for the outside of the holder.


Once the buttons were made, I sewed and cut in the button holes.


Then I got to work on the outside of the holders. I wanted them to all be different, but with the same fabrics. I looked through my stash and found these that I thought would all be cute together. I used two fabrics for each one and made a little curvy design on the front.


That part took a good amount of time, but once it was done the rest was simple. I just sewed the batting and lining fabric on, flipped them right-side out and then closed up the hole. Then I blind stitched the bottom and about 10 cm up the side so that the files won't fall out.


I slipped a file in the holder so they would know what the gift actually was. I love how these turned out and kind of want one for myself, although I have no idea why I would actually need one. Maybe one day when I am all caught up on projects that I want to do, I'll get around to making a new one for me!


Friday, March 14, 2014

Baby Tunic and Leggings


One of my neighborhood friends had a baby girl about three months after T was born. The baby girl was still in her mama's tummy at our Halloween party, but at the party, we talked about T's costume and the fact that he will never wear those black leggings again.


I asked her if maybe she would like them for her baby girl when the time comes. She was all for it. The time came, but it seemed weird to give her just an old pair of black leggings, so I decided that I would just make a little outfit of it.

Using the same peasant dress pattern that I have used before, I made this little one. I changed it slightly to add long sleeves since it would be Spring when the little girl would likely fit into the leggings. I intended to still keep the sleeves a tad poofy and close them around the wrist with elastic, but I had a little mishap and had to rethink the situation. I pared down the sleeve and now it is just a regular old sleeve. I also made the length a little shorter since I wanted it more of a tunic than a dress. I didn't know how long to make the tunic, since I don't have one just sitting about, so I used one of T's onesies to kind of guess the length. Hopefully it's not too short!


The dress is so simple to do up. Cut out the pieces, sew on the sleeves to the front.


Then sew them to the back piece. Do up the hems and add elastic to the neck. Done! (Note that this photo is pre-neck elastic.)


Next up were the leggings. I figured I could just leave them black, but why not add something cute!? I was considering ruffling the bum with the same fabric, but decided against it. I settled, instead, on little bows. They were super simple to make.


Then using T's old leggings, I just sewed them to the lower, outside seams. Another friend and I went over to meet the little one a few weeks back and she is just adorable. Hopefully this little outfit fits her soon - Spring is on the way! Hopefully!!

Thursday, March 13, 2014

Turtle Fail


Last week I got a crazy cold that had me in bed each night with the boys - at 7pm. This week I am feeling much better, but I am still quite exhausted and also trying to catch up on everything I didn't do last week. I'm not sure if I have mentioned it on the blog, but we are going to be moving to the US for a few years. Y put in for a transfer and got it! We will probably head out in May, which gives us a bit of time to go through our entire place, throw stuff out, and organize for the move. As a result, I probably won't be doing too much for the blog in the coming weeks. The good news is that I have a lot of projects that I have done and just not yet blogged about. So, hopefully I can stay up on posting twice a week, but I might slide every once in a while.

Anyway, a few weeks ago, K's school took a field trip to the aquarium. K was very excited about this! They got to take an onigiri for lunch and some snack. I asked K if he wanted to go to the grocery store to pick something out, but he requested that I make bread that looks like a fish. Hmmmm...I had no idea if this was something he had seen before or had just come up with, but my breadmaker book has a recipe for sweet turtle breads (カメロンパン - kame melon pan). I decided this would be the easiest route. I started with the dough in the breadmaker. Once the dough was ready, I divided it into quarters and then chopped the tops off of each triangle.


I divided the top half into five little balls and put them on a lined cookie sheet.


I streched the balls so that they slightly resembled a head, a tail, arms and legs. Then I rolled the top and put the turtle's back on the body parts.


The next step was to make the top cookie part of the bread. I mixed butter and sugar with some egg.


Then added flour and mixed until it looked like batter. Kind of.


I divided that into quarters, rolled each quarter out, and put a shell on the turtle.


Then I scored the cookie so it would look more like a shell. This was not in the instructions in the book - I just thought it would look cute. This could be the start of where everything went awry.


I let them rest so they could rise and when I checked back on them I was so sad. They turned into little blobs. Not the cute little turtles I was hoping for.


From the side they don't look too bad, but this was prior to baking, mind you.


When they were baked, they didn't look like turtles at all. Luckily I made them on a Tuesday night and the field trip wasn't until Thursday. We still had time to go buy something else for K to take. In the morning I showed him the blobs and told him that it was no problem if he wanted to go to the grocery store to get something else to take. He looked me in the eye and with the sweetest little voice said, "But mama, I love them." My heart exploded. I didn't know if he was just saying that to be nice to me, but Y told me that K told him how excited he was about his kame melon pan that mama made. I love him.


The final obstacle was to find something to put the turtle in so that K could throw it in his backpack without crumbling it. I found this bento box at the 100 yen store and it was the biggest one I could find. I had to squish the turtle in there, but he fit and K took him on the field trip. He only had a few bites of the turtle, but that was just fine by me.


Friday, February 28, 2014

The Very Hungry Caterpillar Cookies


Earlier in the week I posted about the Very Hungry Caterpillar that I made for a friend's little boy. A few weeks before the party, my friend and I were talking about the party details and she texted me a photo of the cake/cupcakes she was going to make as well as some cookies that she loved, but wasn't planning on making. Good news for her, I was - what's a party without cookies afterall?! While we couldn't attend his party, as we were in Hawaii, I figured we could be there in Sugar Fairy spirit.

The cookies from the original photo were the fruits from the story - apples, pears, plums, strawberries and oranges with little holes cut out of them. They were really cute and something that totally looked do-able. The first step was to plan out how I would cut them since I don't have fruit cookie cutters. I figured I could start with a circle and cut from there. Here was my plan:


I started with the circle and then cut away. The first few I used the knife to cut out the shape as I had drawn it. This gave me ragged edges though and I wasn't too pleased. You can kind of see if you look at the strawberry cookie in the photo below.


After a few goes, I worked out that if I just cut straight lines, the shapes would be much easier to control and in turn look much better. After cutting the lines, then I just used my fingers to smooth out the edges. Here is the just-cut look.


Here is the post-massage look.


It worked for all of the shapes, excluding the orange which was just a circle.


Once I had it cut out, I took a small circle cutter and cut out a little hole in a corner. Then I popped them in the oven. (Apologies for the sideways photo - I don't know how I didn't notice that while I was taking the photo.)


Pulling them out, they looked like this.


I had a good amount of fruit shapes baked, so I thought with the scraps, I would try to make a little caterpillar. I started by cutting out the shape of the body and then with a knife I scored the details. I figured this would help when decorating it. I also made an oval and a speech bubble.


Then it came time for decorating. I wanted this task to be as easy as possible, so I lined the cookies up by color and tackled the project in batches. First up was red - apples, strawberries and the caterpillar's face. I outlined the hole in the cookie and then the shape. I found that my icing wasn't stiff enough, so if I got too close to the hole, it would drip in. I had to be a tad bit careful, but it all worked out. Once I had the outlines done, I went back and filled in each cookie.


I continued with all of the colors, one by one. Once the base color was done, I went in and added brown stems and a few green leaves, as well as the details on the caterpillar.


Eeeek! I love them!!! Although it's not in the photo above, once they were completely dry I also used a black food marker to give the strawberry some seeds. I was considering using my food colors to paint on each cookie so it would look more like Eric Carle's artwork, but that made me nervous and also, to be honest, I really had to get packing. While they are much simpler looking than the real images, I feel they are cute and recognizable.


The one I was most proud of was the caterpillar. To give him his segments, I started by outlining and filling in every other segment. Once they were pretty dry, I went in a filled in the rest of his body. Then it was just a matter of the face, antennae and feet. I love him.


The cookies were ready to send off to my friend. The only problem is that I had to get them to her nearly a week before the party, as we were leaving on our trip in a few days. Frosted sugar cookies can most definitely be frozen, but sometimes they get spots while they defrost. I looked into why this happens and it seems that no one can work it out - just sometimes it happens, sometimes it doesn't. Frustrating. I did read that packaging them individually and then putting them in tupperware helps the situation. That is what I did, but in a photo from the party, you can see that some of them got weird. The good news is that the discoloring doesn't affect the taste. My friend said that they were a hit at the party and another friend, who had attended said the same. Perfect!!