Friday, April 12, 2013

Animal Breads


Last week, K and I were invited to a barbeque at my students' house. All three of my students and their moms would be there, as well as the sisters' dad. K was super stoked because he LOVES playing with the girls. They are always so sweet to him and totally treat him like a little brother - he's a lucky little guy! I wanted to bring something, but I really didn't know what to make. I settled on little animal dessert breads.


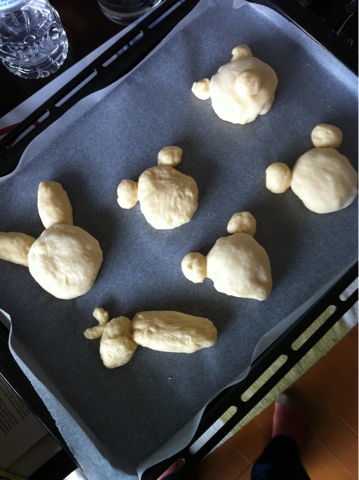
I used my bread-maker to start with a dough that is on the sweet side. Once it was ready to be rolled out, I cut the dough in half and then cut one of the halves into six equal-ish pieces. K was finishing his lunch as I was doing this and desperately wanted to help, but as we were taking these with us, I tried to take charge. I let him help me choose the animals to make. I started with a bunny, and then he suggested a bear, next was a Japanese cartoon character - Shimajiro, a mouse, and then he was about out of ideas. I opted for a pig and then he busted out with a giraffe. Uhhhh...really? I didn't want to turn him down, however, so the final bread was a giraffe.

With the other half of the dough, I used cookie cutters to cut out shapes. I wanted to see if I could make cute little breads for K's school lunches. Mini rocket peanut butter and jelly sandwiches sounded so cute to me! These ended up really cute, but I kept forgetting to take photos - you'll just have to trust me.


I baked all of the breads together and once the animals had cooled down, I used a chocolate pen to decorate them. They were all turning out so cute...then we got to the giraffe.


K was pretty pleased with it, but let's be honest, it looks ridiculous!


I took the breads to the barbeque and the girls loved them, as did the moms. I told them moms about the giraffe situation and they cracked up. Then the littlest girl came out and we asked her what the giraffe was and she answered with, "a cow!" The older sister, however, got it on her first try; we warned her to look carefully though.

K had such a fun day with the girls. They played in the yard,


K talked to the fish,


held the dog,


and sat on the horse while the older girls played Wii.


Wednesday, April 10, 2013

Wrap Dress


I know I have been a bit absent recently - things have been busy. Aside from the standard things that keep a mom busy, K had his Preschool Opening Ceremony (入園式) today and I had nothing to wear. Ages ago, I came across Megan Nielsen's maternity patterns and really liked the wrap top and also the ruched t-shirt. I bought both of them and was so excited to make them. Soon after buying them, but before they arrived, I found this blog about using the wrap top to make a dress. I figured it was serendipity - this was the dress I would wear for the Opening Ceremony!


I started by cutting out the pattern and drafting the skirt pattern from a maternity dress I already own. I also took the length of the top of the dress I currently own and used that for the length as opposed to what the blog had suggested. I also kept the sleeves the original length as it is spring and I was hoping for a nice, warm day.


I was super excited to get started on the dress, but I really wanted a double needle to do the seams. I couldn't find it anywhere here and my friend that also sews a lot here had never heard of it. I finally had my mom buy a few and send them to me. I started with the skirt bit since it seemed the simplest step. Unfortunately, I couldn't get the needle to work well and it skipped a lot of stitches.


It helped a bit to put tissue paper to stabilize the fabric, but still skipped a good amount. I was really bummed! I thought this needle was going to be the answer to all of my knit issues. I was wrong. To be fair, I do need to give it another go. I was in a frenzy to get this dress done on time and didn't have a lot of time to try other methods or really research about this issue. The seam did sew together, and as this was on the inside, I figured it would be fine. It did give the seam a lot of stretch, which was great!


Once the skirt was done, I got moving to the top. It was simple to put together - shoulder seams, side seams and then add the sleeves.


I tried the top on first, because if that didn't look right, I knew the dress would be a disaster and it would probably be best to just stop while I was ahead. I tried it on and really liked it. I should say here, that I ended up using the blog I linked above for inspiration only. I put the dress together completely differently, but love the end result. I really wanted the top to be a true wrap-around top, but the original dress made it just a faux wrap top.


To finish the neckline I figured best not to chance it with the double needle and just used single fold bias tape.

I put the bias tape only to about the side seams. From there I just folded the top edge over and sewed a long seam all the way down the wrap bits.


I made the waist of the skirt bigger than the waist of the top so I could have a bit of space. Then, of course, I had to make them fit together. I sewed a long stitch across the front and back of the skirt and then pulled the bottom string to ruffle it until it was the same length as the top.

Finally I sewed the top to the bottom, leaving a few inches open on the left side seam at the join of the top and skirt so I could string one of the long strips through.


Finally I put on my dress and headed out to K's Ceremony. It was so cute. The kiddies in their tiny uniforms were just to die for. (K is in between the girls with the pigtails.)

 
Today we rode the train as a family, but the next time K goes he will ride the school bus by himself. I'm a tad nervous, but he really loved the school today. In fact, he cried when it was time for us to leave. I'm just hoping he doesn't lose it getting on the bus next Thursday. Fingers crossed!!
 

After the Ceremony, we headed home and had a nice, big dinner with Y and his parents who came in from Yokohama for the festivities. For the actual Ceremony, I also wore a brown and cream striped blazer from way back when I used to work. The browns matched perfectly and I think it looked quite cute.

Friday, April 5, 2013

Chocolate Caramel Cheesecake


Monday was Y's 33rd birthday! He had the day off, so we celebrated by having a picnic under the cherry blossoms at a huge park near us. Unfortunately his allergies were out of control. We played for a bit, had lunch, played a bit more, watched some break dancers and went home. After dinner, we busted out the cake. I made the chocolate cheesecake for him, as it is his favorite. I have made this cake numerous times at this point, but I tweak something nearly every time - and this time was no exception.


The last time I made this, I had mentioned that I wanted to try swirling caramel into the actual cheesecake batter for a bit more of a caramel taste. So, I started out by making the caramel. I am so confused as to when the perfect time to stop burning the sugar is and this time, I don't think I let it get brown enough before taking it off the heat. As a result, it wasn't a very perfect caramel, but I figured it would work nonetheless.


Also, since this was his birthday cake, I decided that I wanted it to look particularly pretty. I wrapped the cake pan in two layers of tin foil to prepare it for a water bath. Then I crushed up a bunch of Oreos and put them in the bottom.


I mixed up the batter, only using 2/3rds of the recipe. Then I added in a healthy dose of chopped pecans. I don't really like the way the cheesecake looks with pecans on top. I think it looks kind of messy, so instead I loaded them up in the batter itself.


Once the pecans were mixed in, I added my caramel. I probably mixed it up a tiny bit too much - something to keep in mind for the next time.


I put the batter into the pan...


then put the cake pan into a larger, square pan and filled it with water. Baking in a water bath almost always ensures that the top doesn't crack. The downside is that it takes much longer to bake and thus you risk burning the top of the cheesecake. You have to keep a bit of a closer eye on it than if you were just baking like regular. I think in total this cake took an hour and 40 minutes or so (I don't quite remember), as opposed to the hour to hour and 10 minutes on the instructions. Keep in mind, that I only used 2/3rd of the recipe as well.


While it did take a bit extra care, look at how beautiful it turned out!!! I let it sit overnight and then the night of Y's birthday, after dinner and baths, I got started on the topping.


I made a half recipe of caramel - this time I got the consistency and color perfect! Yay!!


Once the sauce had cooled a bit, I drizzled it on top, being sure to go in only one direction. While the caramel was cooling, I melted some chocolate for the top so that it would have some time to cool as well.


Once the chocolate had cooled a bit, I drizzled that on in the opposite direction. I love how it looked when I was done! It is exactly how I had envisioned it.


It also tasted delicious. I LOVED the caramel in the cheesecake. Every once in a while, you would get a tiny hint of it. As above, I think I will be a tad bit more careful about mixing it in next time around. I want more of a swirl effect, although I am not sure how possible it is. Will the caramel end up melting into the cheesecake while it bakes? There's only one way to find out!

 
Happy birthday, my love! I hope you enjoyed your day. 

Wednesday, April 3, 2013

Maternity Jeans - With Pockets!


I'm now 21 (almost 22) weeks pregnant and my stomach just keeps getting bigger. I suppose that is what is meant to happen, but it still surprises me. A while back, I posted about some jeans that I cut up and made into maternity jeans. I like them a lot still, but they don't have front pockets anymore since I cut them out. I found a tutorial online about how to just replace the pocket fabric with jersey and then you have maternity jeans with pockets! Ingenious!!


I started out with my favorite pair of Uniqlo jeans.


As per the tutorial, I cut out the pocket part.


At first I cut out only the top half of the pocket, but I ended up cutting all the way down to give myself some more space.


Then I took a ribbed, jersey tank top and got cutting.


I used the back of it and cut out two long rectangles, leaving the front intact in case I want to use it for something else one day.


Then I folded each rectangle in half and top-stitched the fold.


Finally I lined the jersey up with the cut-out pocket bit and got sewing. And...


Voila! Five minutes later I had pants that fit again.

 
Here is a photo of the pants inside out so you can kind of get the idea of the pockets. I love these pants even more than the original maternity jeans I made. I like having pockets; although I hardly ever use them it is nice to know they are there. The only minor issue is that when I made these (and took the photos) a week or two ago, the jersey streched out quite quickly so I needed a belt to help hold them up. The bigger I get, the less necessary a belt is. I am pretty sure that had I used better quality jersey, the stretch would have rebounded more making these perfect from the start. 
 

As above, these photos were taken last week, I think. Look at my big belly! We went to the doctor yesterday and everything seems great. We saw the baby's heart - all four ventricles, fingers, lips, legs, and such. As we did when I was pregnant with K, we are not going to find out the sex of the baby until the little one pops out, so the nether regions were not a focus. I am feeling the baby moving about a lot now, which is always kind of fun. The only problem is that the doctor said I have gained a bit too much weight - almost 9 pounds total. I looked online at the American standards and for my starting weight and height I am still under the recommended weight gain, so I don't feel so bad. According to my doctor, I am meant to be careful with my eating from here on out. Wish me luck!

Finally, here is a photo so you can see the top of the jeans in action - they look just like real ones. Wahoo!!

Tuesday, April 2, 2013

Meringue Bones


Last week I wrote about some dog cupcakes that I had made for a party. As K and I were also invited to the party, I wanted to bring something else along. I thought little bone-shaped meringues would be adorable, delicious and such a sweet complement to the dog cupcakes.


A while back I made mint and lemon meringues, but I decided to use an older recipe that I quite like. I omitted the chocolate chips and of course the strawberry topping, but other than that followed the recipe.


I mixed and mixed. I am always worried that the meringue won't puff up, but it always does. It just takes a while sometimes.


Once it was ready, I put the meringue in a piping bag with a big tip and piped out little bones. It took a couple of tries to get a good shape, but once I worked it out they turned out quite well. I started with a little 'u' and then worked my way down and bit and finished with a little 'n', if that makes any sense.


I took them to the party and they looked so cute next to the cupcakes. Unfortunately with all the cooking and people in my friend's house, they got a little sticky. People still ate them, however, and in the end, I think they were more for looks!


The hostess of the party also bought a Nana-chan (the dog's name) cake from a bakery. It was adorable! All three of the desserts together looked so sweet.