Friday, September 7, 2012

PB and Chocolate - Always a Winner


I'm a big fan of the old PB and chocolate combo. It's always a winner. I've been back to making cookies this week and have really been craving peanut butter chocolate ones.

I don't have a recipe I'm super fond of, so I hit up google. I found the most delicious recipe ever. OMG are these cookies amazing.


I followed the recipe closely except when it gets to the final preparation step of mixing in chocolate chips. I used cut up chocolate bars since chips are non-existent here and I used way more than suggested.


I don't really know what came over me. Maybe I was worried there wouldn't be enough, as per the White Chocolate Cranberry cookies from earlier in the week? Regardless, I just kept chopping and adding, chopping and adding.

It was difficult to form some of them into balls sometimes due to the overwhelming amount of chocolate.


They all baked up beautifully, however, and I think next time I make them, I'll be putting three bars of chocolate in again.

Another thing I loved about these is the dipping in sugar after forming balls, and before the smash. Extra deliciousness? Yes, please!!


Seriously, these are super good. If you're in a PB Chocolate mood, these will most definitely do the trick.

- Posted using BlogPress from my iPhone

Thursday, September 6, 2012

Door Stop


We live in a wind tunnel. If the living room balcony doors and the front door are open, we get the most glorious breezes. Occasionally, however, the breezes turn into gale force winds slamming bedroom doors shut with great strength and a subsequent noise that makes you jump. Sometimes the forces are so strong they throw open the bathroom door, literally bending the hinges. While this is not the best photo, you can see that the hinge is no longer straight.


In order to keep K's bedroom door from slamming shut (slamming doors and fingers don't mix, just ask my mother about my thumb), we took a pillow from the sofa and placed it near the door frame.


The poor pillow was demoted from it's once respectable spot on the sofa to the floor in K's room. That's sad. Something had to be done.

The pillow was doing it's job quite nicely, but I thought something with a bit more weight would be nice so we could keep it open a bit wider if we wanted.

I had leftover Thomas material from a different project (I'll blog about it later), so given K's love for Thomas, I used that. The print is fairly large, however, so I wanted the door stop to be a bit big.

I started by cutting two tall trapezoids for the sides, two rectangles for the front and back, two long, thin rectangles for a strap, and two smaller rectangles for the top and bottom. To provide a bit more traction, I also cut a rectangle of plastic grip used in drawers and on shelves.


The assembly was super easy! Sew the front, back and sides into a tube, leaving a little space about 2/3 of the way up to flip the door stop right side out at the end.


Then sew the strap together and flip so it's right side out.


Sandwich the folded strap between a side trapezoid and the top and sew completely around the top square.


I figured the plastic grip would slide around while trying to sew it to the bottom, so I basted it to my bottom rectangle first and then sewed it to the bottom of the tube.


Then just flip, fill, and sew up your little hole. I filled mine with soy beans at the bottom and then regular stuffing at the top. I think it looks adorable and worked well all day today. I don't think K even noticed it, but luckily Y did, so it's all good.

Most importantly, the demoted pillow is back to it's standard position on the sofa.


- Posted using BlogPress from my iPhone

Wednesday, September 5, 2012

White Chocolate and Cranberry Cookies


As I mentioned earlier in the week, the weather has cooled off slightly, so I am back to baking!!

Months ago, we made a Costco run and I bought a gargantuan bag of dried cranberries. I love dried cranberries. On the back of the bag were a few recipes, one of them included was this cookie recipe. I'd been wanting to try them, but kept forgetting. I am near the bottom of the bag, however, so it is now or never.

The recipe is simple. Cream 150g of butter with 2/3 cup of brown sugar. Then mix in two eggs.


In a separate bowl, mix 1 1/2 cups of each flour and oatmeal, 1 teaspoon of baking soda and 1/2 teaspoon of salt. Slowly mix that to the butter/sugar/eggs.


Once it's all mixed in, add 2/3 cup white chocolate chips or chunks and 1 1/4 cup dried cranberries.


I dropped 1/2 tablespoons worth of dough onto the cookie sheet and baked them for 8 minutes, 30 seconds on 180C.


The cookies are good, but I wouldn't call them great. Because of the 1:1 ratio of flour and oatmeal, they are pretty cake-y and you can hardly taste the oats. I'd probably add more oats, less flour the next time.

Also, I don't think there is enough white chocolate. I'll either add more next round, or drizzle them with white chocolate once they are baked.

All that being said, however, I've certainly eaten my fair share of these. They are nearly gone!! Off to go have a few more.

Ahhhh, how I missed baking.


- Posted using BlogPress from my iPhone

Tuesday, September 4, 2012

Flowery Ruffle Dresses


A few months back, I had a post about my need for a daughter. I'd made a little dress, diaper cover and hat for my friends' daughter. Soon after, another cutie was born to a beautiful couple. This little one joined made an adorable three-year old a big sister.

Given that girls' clothes are such fun to make, I wanted to make them dresses as well. I'm a bit on the fence about siblings in matching clothes -- sometimes I think it's done really well and looks adorable; other times I'm not in love. I'm not trying to offend anyone (I'm sure if you do the matching thing it always turns out adorably.) As a result, I didn't want to do 100% matchy-matchy, but about 90%.

I used the same fabric as the other baby dress, because I love it and the summery vibe it gives off. I started with the 0-3 month dress. I used the same pattern as the other baby dress, but added a ruffle down the middle instead of lots of trim at the bottom.


I adore the shape of this dress and imagine that if I end up with a daughter, she will have a closet full of these little guys.

I wanted the ruffle to look really finished, so I sewed a tube, turned it and then ruffled it so it looked pretty from all directions. I'm not sure how much, if any, I've mentioned about my sewing machine, but it is about as basic as it comes - straight, zig-zag and button holes. To do the ruffles, I always sew a zig-zag and then pull a thread. It always ruffles up so nicely. Not this time. Since the fabric was thick, it was difficult (read: impossible) to pull the thread. It ended up breaking!


Then I changed the thread tension to the lowest possible setting and thankfully, it worked like a dream.


Next up was the ruffle bum diaper cover. Oh how I adore ruffle bums. Again, I made this the same as the other baby's, but I made the ruffles a bit wider this time.


I love, love, love how this little outfit turned out - I hope my friends liked it too!!


Finally was the big sister's dress. I thought a ruffle down the front would be cute for hers as well, but I though an inset ruffle would be a tad more grown-up, she just turned three after all. I found this pattern by Peel-A-Boo Pattern Shop and fell in love. It even has a key hole tie in the back!!

As a side note, I would totally recommend this shop. There are about a million cute patterns on it and the woman who runs it was extremely helpful when I ran into printing issues.

Back to the dress, because of the patterned fabric, I totally messed it up first time around. I don't know why, but when cutting the fabric I wasn't thinking at all and didn't line the front pieces up properly. I ended up with a front that looked like junk and no more fabric to cut from. Whoops!


That weekend, I went back to the fabric store, picked up a bit more and carried on with the dress, this time cutting it properly. Ahhh, much better.


The rest of the dress was pretty simple, puffy sleeves and and the cute key hole back to boot.


I am a bit curious as to how it fits, given that the neck goes up a bit. It almost looks like a Mandarin collar of sorts.


On the models, it doesn't seem so high, maybe it's one of those once-you-put-it-on situations. Then again, maybe I did something weird while cutting/sewing. I hope not.

Anyway, (although it's months late) congratulations on your beautiful baby girl!! I can't wait to meet her (and her big sister) one day. Enjoy the dresses.


- Posted using BlogPress from my iPhone

Monday, September 3, 2012

Grape & Peach Popsicles


I've been popsicle-crazy recently, but I write this post on a stormy night with cool breezes. In other words, if you are over my popsicles, you're in luck because cookies are coming back into the picture this week!

I actually saw the idea for these on parents.com a few weeks ago and they stuck in my mind. I think the colors look so pretty together. They remind me a bit of stained glass.


They were a cinch to make. Pop a few slices of canned peaches into each popsicle mold and then fill up 'er up with grape juice.


Maybe I cut my peaches a bit too big, because getting the stick in was a bit of a challenge. As a result they froze all weird, but still tasted good! (Also, they got tipped over in the freezer and spilled a tad - whoopsa daisy.)


Who knew frozen peaches were so good?!?


- Posted using BlogPress from my iPhone

Friday, August 31, 2012

Pineapple Coconut Pops


I've totally been on an ice pop kick and seriously, I see no signs of this stopping. They are simple to make and delicious to eat!

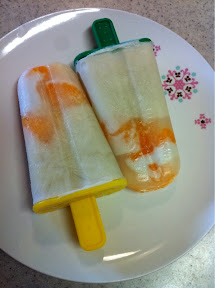
I love the coconut/pineapple combo, so figured I'd transfer it to popsicles. I started with coconut milk, pineapple juice and canned mandarins.


I wanted these to be sectioned. At the tip would be a coconut milk layer, then a coconut/pineapple layer and then pineapple juice at the top all with mandarin oranges throughout. This didn't happen.

First I tried to stick the mandarins to the mold, just like the bananas in the strawberry/banana pops, but they were too slippery and just kept sliding down. I dropped a few in anyway and then mixed coconut milk with a tiny bit of pineapple juice, just to thin it out a bit and put a tablespoon or two into each mold, then to the freezer.


I'd given them about 30 minutes to freeze and then did about a 1:1 mixture of coconut milk and pineapple juice. I put a few more mandarins in and then added the second layer.

It was at this point that I realized the layers weren't going to happen. The first layer wasn't all the way frozen yet, so the new layer started to seep in. Additionally, if I put the second layer in and froze it, how could I have fit the sticks in?!? Duh!!

In the end, I just added more pineapple juice, put the sticks in and hoped for the best.


When I pulled them out the next morning, a few hours before a friend came over, I realized they were nothing at all as I'd envisioned. I served them anyway and the boys loved them. Overall, another popsicle success! Seriously, is there any way to mess these up?!?


- Posted using BlogPress from my iPhone

Thursday, August 30, 2012

Homemade Fudgesicles


Fudgesicles. Chalk them up on the list of things I can't get in Japan. They are so delicious, and yet when I am at my parents' I always forget to get some.

As I mentioned earlier in the week, it's hotter than the bejesuses here and although I want to eat a cookie, I just can't do anything that will make me even hotter. Fudgesicles it is!!

I looked online for a recipe and found one on Smitten Kitchen. Given that I generally like the stuff I find on there, I decided to give it a look.

Much like her I was a bit concerned with the lack of chocolate in the recipe, but I trusted her and am super thankful for that!


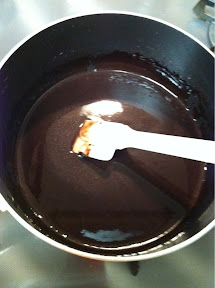
I followed the recipe except I used dark chocolate and dark cocoa powder. It's all I had on hand and I like it more than milk chocolate on occasion. You can hardly see how much chocolate there is, seriously it's a very small amount - 21 grams.


Melting it did nothing for my doubts, in fact I'm pretty sure that made them worse. After adding a the other ingredients, I was starting to feel a bit better about the situation since it looked and smelled phenomenal.


While I was letting it cool a bit before putting it into the molds, I couldn't resist taking a taste.


It didn't stop there. Yikes!!! This stuff is amazing!!!

I poured it into my molds, but it wasn't enough to fill them to the top.


I'm not sure the cause of this -- shoddy pouring? Big molds? Too much tasting? I'm guessing the latter, but the jury is out until I do round two, which will likely be soon.

As a result, the stick didn't go all the way into the Popsicle and then separated when I tried to take them out.


It was a bit of a pain to have to dig my fudgesicle out as if it were some buried treasure, but it totally worked and I'm sure the taste was unchanged.


Seriously, these are delicious. Amazing, really. I may or may not have just eaten the others straight out of the mold. Screw the bowl and proper eating etiquette. I can't wait to eat them again!!

- Posted using BlogPress from my iPhone