Friday, June 15, 2012

Pudding and Meringues


On Tuesday a good friend came over for lunch. I asked Y if there was any specific dessert he wanted and he asked for cheese cake. I asked if there was anything else he'd want (given that I just made a cheese cake), and he answered, "banana bread." Dear me, I'd just recently made that as well! I asked for a third suggestion and he asked for pudding. Whew!

I used an Emeril recipe that I've made many times, always with great results. It's a pretty standard vanilla pudding.
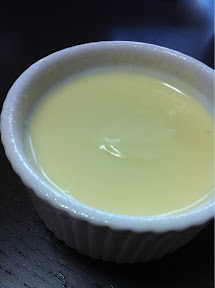


The recipe uses three egg yolks, however, leaving me questioning what to do with the whites. Alas, meringues are always a lovely treat.

Just before Christmas one of my very best friends sent me an amazing package of baking goods from King Arthur Flour. One of the items she sent was Lemon Juice Powder. It is AMAZING!! During the holiday season I made meringues with a teaspoon or two of this powder thrown in. They were always delicious - like mini lemon meringue pies!!


The yellow swirls add a bit of cuteness and are so simple to do. Once your meringue is ready and the tip is in the piping bag, just take some gel food coloring and a food-safe paintbrush and paint lines up the bag. The semi-difficult part is trying to get the meringue right in the middle of the bag. If it's not in the middle, the lines will be a bit messy.


Then just pipe and bake as instructed. Unfortunately it's rainy season here and the little guys just weren't drying out in the oven. I was tired and over it, so I set the oven for 30 more minutes and went to bed. In the morning I checked on them and they had browned a tiny bit. They were quite crispy though, so that was good. You couldn't taste the caramelization too much, just see it a bit.

You may know this, but during my previous meringue stint, I read that you can put baked meringues in a Tupperware container and freeze them. They last for ages and there's no defrosting involved. Just pick one out and pop it in the mouth! They are perfect for when you need a nice, sweet treat.

- Posted using BlogPress from my iPhone

Wednesday, June 13, 2012

Cake Balls and Cute Nails


One of my friends, who happens to have a son just about K's age, has started a mini nail salon in her house. We set a date for K and I to go over. Of course K and her son would play while I got my nails done.

After a year or so if doing her own nails, she decided that she'd give manicures to the moms in the area. Since we are all just moms, the price is super reasonable, and the first time is free! If you end up liking it, then you can come back and give her what is fair.

Since I wasn't paying, I figured we should bring a nice snack along. This mom is super cute, so I wanted the snack to be cute as well. I settled on cake balls decorated with sprinkles. K of course wanted to help, so I let him do the sprinkles. He was stoked.


He put so much concentration into each one and made sound effects as he sprinkled them. They certainly were a bit uneven, but he was so proud of himself that I just couldn't bring myself to fix them.


It cracked me up.

Turns out, the mom is awesome at gel nails!! I looked through a few magazines and finally settled on these.


Glitter + rhinestones?!? I'm in love!! Although it sounds so conceited, I can't stop admiring them.


Since they are gel, she said they should last a few weeks. You can bet I'll be going back as soon as they get a bit junky!! I can't wait to pick out a new design.

- Posted using BlogPress from
my iPhone

Tuesday, June 12, 2012

Rainbow Granny Square Bag


One of my very best friend's daughter turned 4 today. Niina (the daughter) is cute as can be and always so super sweet to K. K ADORES her. Whenever we pass their condo complex, he can't help but ask if we are going to play with her. Now she's in kindergarten and I think he's really missing her. He "calls" her nearly every day on one of his play phones. It's hilarious.

Anyway, the kanji for little Niina's name means "rainbow comes". It's the middle of rainy season here, so it's such a sweet, happy, bright name. That being said, I have never been much of a rainbow girl myself, but I can't look at this yarn and not smile.


Niina's mom is an excellent sewer, but she doesn't crochet. So a crochet rainbow bag sounded like the perfect gift for Niina.


I had never done a granny square before, but they really are quite simple, thanks to the Internet.


I started out with eight rainbow granny squares, then edged them in white and sewed them together.


I had no idea how long to make the strap; instead I made button holes so that it is adjustable. I think it's a cute idea as she can wear it a few ways and even as she gets older if she wants.


Niina has two Disney baby princess dolls that she loves. I thought it'd be cute if the dolls each had a granny square bag as well.


Eeeek!! They are so tiny - I think they're adorable!!

Now Niina and her dolls can match handbags.


Happy Birthday, Niina!

- Posted using BlogPress from my iPhone

Saturday, June 9, 2012

Magnet Book Bag


In my past few posts, I've written about visiting my friends and their new baby. I am so cut out to be the mom of a daughter who bakes cheesecake whenever our cravings may hit.

While we were there, they gave K a super cute car magnet book. It came with a million little magnets that just two days in I was finding everywhere. Some sort of organization was necessary.


Using the same idea from the I Spy Bag, I made a little pouch with a see-through front and elastic bands to keep it with the book when not in use.


It was really quite simple to make. I just guessed and cut out three fabric rectangles of the same size and two smaller rectangles for the flap. Then I cut the center out of one of the big rectangles and sewed on a plastic rectangle to cover the hole (just like in the I Spy Bag).


Then I sewed the flap pieces ride sides together on three sides, flipped it right-side out, and topstitched, leaving the top end as is.


Next I sewed the other two rectangles right sides together with the flap inserted, leaving a little hole and then flipped it. Then I double folded the top edge of the see-through rectangle so it was the same size as the new one and top stitched.


Then I layered it all up - the big rectangle/flap, two pieces of elastic and the see-through rectangle and sewed around the three sides.


To make it cleaner, I also zig zagged the edges.


Finally I flipped it, topstitched, and sewed on some snaps.


And I no longer get little cars stuck to my bare feet. Wahoo!!


- Posted using BlogPress from my iPhone

Thursday, June 7, 2012

Cheesecake with Fruits


Earlier this week, I posted about an outfit I made for a brand new baby. As I mentioned, her father and I became good friends while working together. One of the things I learned about him while working together is that homeboy likes his sweets!!

I knew I wanted to take some sort of dessert along with us to meet Aria, but was really undecided of what to make. I knew I needed something easily transportable. Y was sick, so that meant it was K and I on a train for an hour and a half with the stroller, Aria's gift, a gift for her older brother and something sweet.

I have a wonderful cake holder, but it would have been really difficult with everything else. Cookies? I wanted something more celebratory. Pie? Doable, but not terribly exciting.

After seeing a friend's birthday cake on Facebook, it was decided - cheesecake with a fruit topping!!

I totally forgot to take photos of it after taking it out of the tin and cutting, but it looked (and tasted) just beautiful.

For the cheesecake, I used an Emeril recipe.

I followed it fairly closely, substituting Maria cookies for the graham crackers. I also skipped the sugar in the crust. For the cheesecake filling, it seemed like an awful lot to me (maybe I have a small tin??), so I halved it. After adding the fruits on top, it just perfectly touched the top of the tin - lucky!!


I started the fruit process by segmenting an orange. I'd never done this before; quite frankly it scared me. Turns out, it is so super easy. I watched a video on YouTube and it worked out perfectly. It only took a few minutes as well.


With that part out of the way, I started layering on the fruit. First were the strawberry halves and mini grapes.


Next up were kiwi slices.


I wanted a full ring of oranges, but there simply wasn't room. I ended up with just a few layered on top.


Once all the fruit was on, I painted on a glaze to make it all shiny and pretty. The glaze recipe says to pour it in the cake, but mine was definitely not liquid enough. It ended up being almost jelly-like. It tasted nice, but wasn't exactly what I was hoping for. To be honest, painting it on was a lot of work. Something I could have just poured would have been way easier. Does anyone out there have a good recipe for this?


It's possible that it's my fault it's not liquid enough. I followed the directions up until the last step where you pour the corn syrup in and let it boil a bit longer. I did this, but it seemed that the more it boiled, the thicker it got. I got nervous and turned off the fire.

It wasn't that big of a deal though. My friend and his wife seemed to enjoy it. Y wanted me to bring a slice home for him, but my friend got a bit pouty about it. I'll take that as a good sign!!

- Posted using BlogPress from my iPhone

Tuesday, June 5, 2012

I Need a Daughter


Last week I made my girly-est cake ever. While I was making that, I was also working on my girly-est outfit ever.

About three weeks ago, one of my favorite families in Japan welcomed a beautiful baby girl. I became friends with the husband years ago while working at the Head Office of a language school. We quickly became quite close, as he is one of the nicest guys I've ever met. His wife and now 7 year old son are just as lovely. The new baby, Aria (possibly the most adorable name ever), seems just as sweet as the others.

After Aria was born, I called Simon to tell him congratulations. At the same time I had him ask his wife if there was anything in particular they wanted for Aria. I was out and it was really loud, so it was difficult to hear, but I thought s/he'd said a "lacy, cute hat." (Simon, I'm so sorry if it was something else that was requested!!)

I scoured etsy looking for a cute pattern and finally bought this one.


As I seem incapable of just following a pattern, I changed it up a bit so the brim of the hat could include a little lace trim. I also added ribbon to hold it on Aria's head. Since the hat is reversible, the outside ribbon is not in use around the baby's (double - how cute) chin, instead it can be tied around the top into a little bow.

Then I thought I'd make a little flower pin to go with it. What's cuter than a pink polka dot flower?


Not a whole lot, but probably that flower attached to a flowery hat, sitting atop a baby's head.


I fell in love with that flowery fabric and decided that Aria needed a dress to match. I used this pattern.


It's a super simple pattern; who knew baby dresses were so easy?!? But, as above, I had to add something. I added heaps of trims - lace, mini pom poms, ribbon and more lace, as well as a bow around the waist.


But why stop there? What if Aria's diaper shows?? We don't need a teenage-movie-star-in-the-making flashing her unmentionables to everyone she sees. Clearly she needs a frilly, lacy diaper cover.


Finally, what outfit would be complete without shoes? Certainly not this one!

I found this pattern on etsy as well and fell in love.


Seriously!!! That flower is about the cutest thing I think I've ever seen on a shoe.


Here is the whole outfit all put together.


The whole time I was making it, all I could think was, "I NEED A DAUGHTER!" I adore K with every fiber of my being, but I will never be able to dress a boy like this. Bring it on, baby #2!!!

By the way, I'm definitely not yet preggers, but wish me luck! ;)

- Posted using BlogPress from my iPhone

Thursday, May 31, 2012

Travel Clutch - Take 3


As I mentioned earlier this week, one of my best friends will soon be boarding a plane to Germany. As a small going away gift, I thought I'd make her the travel clutch that I made for myself before our trip to the States.

After making it for myself, I made one for a friend moving back to the UK.

Each time I make this little guy it looks better and takes me less time. I'm becoming quite the pro at this little case.


I followed the same steps as in the other two, the only difference was that I bought bias tape instead of making it. It turned out way cleaner.


Who's hopping on a plane next?? Should I whip up a fourth?


- Posted using BlogPress from my iPhone